Difference between revisions of "Electrical"
Kloebereng (talk | contribs) |
Kloebereng (talk | contribs) |
||
| Line 78: | Line 78: | ||
[[File:barb.png]] | [[File:barb.png]] | ||
| − | * | + | *Drill, tap the box side for whatever nylon adapter that your conductor or coax cable will pass thru. (I generally use one barb per pass thru, but sometimes combine multiple conductors thru one barb.)<br> |
| − | * | + | *Screw in the adapter, pass thru your cable or conductor, apply heat shrink tubing (HST.) . Voila`.<br> |
| − | * | + | *Where you have multiple conductors thru one adapter, stick a tiny (4" variety) wire zip-tie on the end of the HST to mush the adhesive into the cable/conductor voids.<br> |
| − | * | + | *Mount the terminal strip to the inside box cover (w/ thru-cover, countersunk, flat-head, s/s machine screws and nylock nuts) -- so that with fat fingers it's easier to wire up the strip, and you can bury enough wire/cable in the box to pull the cover out and easily work on the strip later.<br> |
Revision as of 21:43, 9 May 2015
Modern gear such as refrigeration, chartplotters, radar and computers required a well sized and maintained 12v system.
Contents
Alternators and Battery Chargers
- All about alternator belt tension & pulleys Q&A
- Alternator mount/bracket upgrade Important safety upgrade for M25 (not XP) owners
- Battery charger discussion & Xantrex product evaluation by John Nixon
- In-depth considerations on the Xantrex XC3012 battery charger and installation
- Tachometer Malfunction Q&A
- Truecharge battery charger installation under the sink on a Mk II
- Alternator Regulator Wiring Diagrams
Batteries
- Benefits of 6v golf cart batteries
- Detailed discussion of battery types by Jim Moe
- Battery monitor placement
- Deep Cycle Battery FAQs from Northern Arizona Wind and Sun
- Recharging Dead Batteries
Electrical Panel, Wiring & Lighting
- Adding AC panel lights for readability at a distance
- Bow and Stern Navigation Light Replacement
- Cabin lights -troubleshooting
- Diagnosing Dim Nav Lights
- Electrical panel: Designing and building a new one by Mike Vaccaro
- Electrical system upgrade: A comprehensive electrical system upgrade by Jim Moe
- Electrical System 101: Comprehensive electrical system BASICS by Stu Jackson http://c34.org/bbs/index.php/topic,5977.0.html
- Electrical system upgrade by John Gardner (includes pictures of 6V batteries)
- Electrical system upgrade: Another perspective by Mark Elkin
- Electrical system upgrade by Capt. Al
- Wiring Diagram with 4 6v golf cart batteries and starting battery on Luna Loca
- Engine harness upgrade: A comprehensive overview by Gerry Douglas Important WARNING for M25 owners
- Engine harness upgrade by Capt. Al
- Engine Panel Wiring Diagrams
- Galley light installation
- Galley light mounts
- Glow plug solenoid Installation for faster starting
- Panel switch telltales: How to tell the on/off state of panel switches from a distance
- Unswitched 12V wiring instructions
Generators
Inverters
Lightning
Solar Energy
Starters
- Secondary start switch
- Slow start fix with a wiring upgrade, starter re-build, and new starting battery by Mike Vaccaro
Items of Interest
There are over 75 Tech Notes on these subjects.
(Moisture-proof) Alternative to open-type terminal strips
I'm not generally a fan of terminal strips in the marine environment -- IF I can avoid them, I do. HOWEVER I can't, then I use them judiciously -- in the proper locations (e.g., not an open terminal strip, in an engine compartment or bilge, hanging by a thread, no physical protection, wire/cable support/strain relief, etc.)
THAT said, I have probably a dozen terminal strips for everything from mast light wiring to TV/RF to masthead instrument cables. BUT they are mounted in moisture-proof boxes with moisture-tight wire entries.
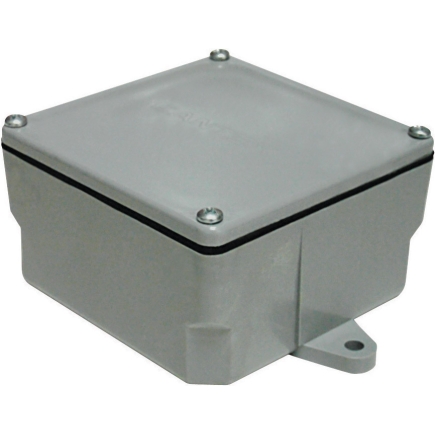
I made my own setups with moisture tight 4" x 4" x 2" PVC Cantex (left) or Carleton (right) electrical junction boxes (from big box building supply/online/Amazon etc.)


They have no openings for conduit or threaded blanks -- just a totally solid case, w/ gasketed cover, and mounting ears so they don't need to be compromised with a mounting hole.
I tried several ways to get a moisture tight wire entry, but this method was the best:
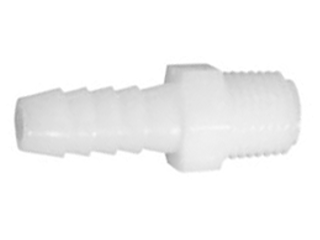
- Get appropriate-size nylon male npt x hose barb adapters -- Grainger carries many sizes -- so I got a dozen of different mnpt and barb combinations, up to 3/8" mnpt.
- Drill, tap the box side for whatever nylon adapter that your conductor or coax cable will pass thru. (I generally use one barb per pass thru, but sometimes combine multiple conductors thru one barb.)
- Screw in the adapter, pass thru your cable or conductor, apply heat shrink tubing (HST.) . Voila`.
- Where you have multiple conductors thru one adapter, stick a tiny (4" variety) wire zip-tie on the end of the HST to mush the adhesive into the cable/conductor voids.
- Mount the terminal strip to the inside box cover (w/ thru-cover, countersunk, flat-head, s/s machine screws and nylock nuts) -- so that with fat fingers it's easier to wire up the strip, and you can bury enough wire/cable in the box to pull the cover out and easily work on the strip later.
Those boxes also come in 6" size, and there's many similar inexpensive, gasketed solid boxes online in rectangular/round/whatnot configurations. Some w/ and some w/o mounting ears.
--KWKloeber 14:18, 9 May 2015 (PDT)
