Difference between revisions of "Air Conditioning Installation"
(boat air conditioning installation) |
|||
| Line 1: | Line 1: | ||
| + | __TOC__ | ||
==Nav station hanging locker installation== | ==Nav station hanging locker installation== | ||
| Line 4: | Line 5: | ||
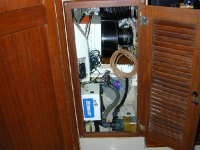
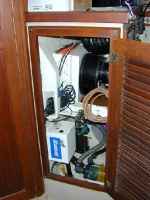
We have a Cruise Air 12,000 BTU unit. It was installed by the dealer we bought the boat from back in 1987. It was installed in the hanging locker in the main salon and does take up most of the space. Here are a few pictures of the installation. We have had to cover the hatches if we needed to be comfortable during the day in the middle of July in a hot harbor in SW Florida. It is big enough to keep the entire boat comfortable at night for sleeping during the summer months here with the addition of a couple of fans in the front and rear cabins. | We have a Cruise Air 12,000 BTU unit. It was installed by the dealer we bought the boat from back in 1987. It was installed in the hanging locker in the main salon and does take up most of the space. Here are a few pictures of the installation. We have had to cover the hatches if we needed to be comfortable during the day in the middle of July in a hot harbor in SW Florida. It is big enough to keep the entire boat comfortable at night for sleeping during the summer months here with the addition of a couple of fans in the front and rear cabins. | ||
| − | |||
| − | |||
| − | |||
| − | |||
| − | |||
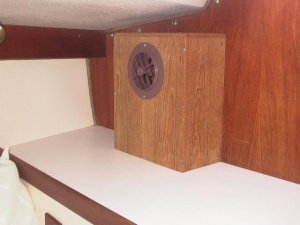
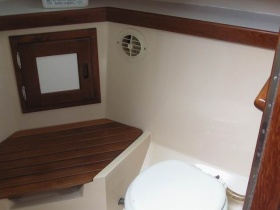
| − | Return grille in the head of 34. (Shadow makes it look strange) | + | <gallery caption="Click any image to enlarge" heights=200px widths=300px perrow=2> |
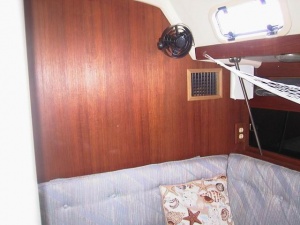
| − | Supply grille at chart table of 34 with controls for the unit installed next to it | + | image:AirConditioning1.jpg|Return grille in the head of 34. (Shadow makes it look strange) |
| + | image:AirConditioning2.jpg|Supply grille at chart table of 34 with controls for the unit installed next to it | ||
| + | </gallery> | ||
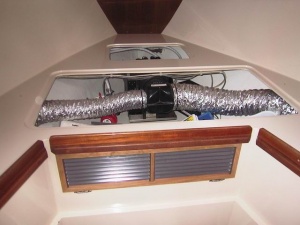
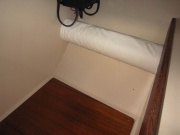
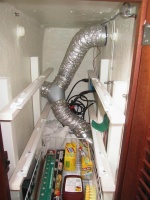
| − | 12000 BTU Cruiseair unit installed in hanging locker of | + | |
| + | <gallery caption="12000 BTU Cruiseair unit installed in hanging locker of Oraios" heights=200px widths=200px perrow=3> | ||
| + | image:AirConditioning3.jpg | ||
| + | image:AirConditioning4.jpg | ||
| + | image:AirConditioning5.jpg | ||
| + | </gallery> | ||
| + | |||
| + | |||
| + | |||
| + | ==Forepeak installation== | ||
| + | '''Karen and Terry Clark, ''Yet To Be'' #1095''' | ||
| + | |||
| + | Southwest Florida has wonderful cruising grounds, but it can be a little hot in the summer, especially in marinas where we can’t swing into the wind. After two summers here, we finally decided to install A/C in Yet To Be, our 1990 C34. Even though we sleep forward in the V-berth, we wanted to cool the aft cabin also for our occasional overnight guests. We also wanted to preserve as much storage space as possible since the C34 doesn’t ever seem to have enough. After looking at several installations, we decided to put the A/C unit under the V-berth and run a duct down the port side to the aft cabin. | ||
| + | |||
| + | We selected a Mermaid 16,500 BTU side discharge air conditioner because it was one of the smaller units available and Mermaid is manufactured in nearby Fort Myers. The weight of the A/C unit far up in the bow doesn’t seem to have made much difference in the sailing of the boat, but we don’t race any more either. | ||
| + | |||
| + | <gallery caption="Yet-to-Be's forepeak installation" heights=230px widths=300px perrow=2> | ||
| + | |||
| + | image:1AC-Yet-To-Be-14666.jpg|I glassed in a platform as high and as far forward under the V-berth as the A/C would fit to preserve some storage in the aft end of the compartment. I replaced the drawer unit with a custom return air grill mounted on hinges to give easier access, and it's worked out great. However, you do have to be careful not to allow anything stored to stick up above the grill to block the return air. | ||
| + | |||
| + | image:2AC-Yet-To-Be-14681.jpg|The A/C is a side discharge unit mounted fore/aft on the platform with the water pump right beside it on the platform. The electrical control box is mounted on the same platform opposite the water pump. The through hull is under the small floor panel just to port and forward of the mast. Water discharge is as high as possible under the V-berth on port side near A/C, about 6" above the waterline. | ||
| + | |||
| + | image:3AC-Yet-To-Be-14665.jpg|For the supply air, I used a "T" splitter directly aft from the A/C with 6" to starboard and 4" to port. The 6" goes through the forward hanging locker and up to a 6" to 4x10" transition fitting from Home Depot which connects to a 4x10" hole in the counter top above the hanging locker. We can still hang clothes in front of the 6" duct. I built a teak plenum box about 5x12x12", open on the back and bottom, that fits over the hole and against the bulkhead. | ||
| + | |||
| + | image:4AC-Yet-To-Be-14664.jpg|There is an 8x10" grill in the bulkhead opening into the main cabin and a 4" round vent in the plenum opening into the forward cabin. That takes care of the 6" side. | ||
| + | </gallery> | ||
| + | |||
| + | <gallery heights=200px widths=180px perrow=3> | ||
| + | |||
| + | image:5AC-Yet-To-Be-14672.jpg|The 4" side from the A/C runs through the lower compartment on the forward cabin port side, | ||
| + | |||
| + | image:6AC-Yet-To-Be-14673.jpg|through the upper, outboard corner of the forward under settee storage compartment in the main cabin, | ||
| + | |||
| + | image:7AC-Yet-To-Be-14674.jpg|along the top, outboard corner of the holding tank to the open area near the macerator pump. | ||
| + | |||
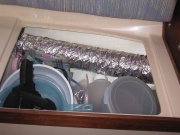
| + | image:8AC-Yet-To-Be-14675.jpg|I used a length of 4" rigid aluminum duct to span the area under the chart table since it was likely to get kicked. It is wrapped in a piece of vinyl that matches the hull liner color and is not very noticeable. | ||
| + | |||
| + | image:9AC-Yet-To-Be-14677.jpg|I switched back to 4" flex duct in the aft hanging locker (there were already slide out baskets in this locker - see the Shelves for nav. closet project) | ||
| + | |||
| + | image:10AC-Yet-To-Be-14676.jpg|and used a "Y" to split off a 4" round vent over the chart table into the main cabin. I also mounted the thermostat over the chart table but away from the vent. | ||
| + | </gallery> | ||
| + | |||
| + | |||
| + | The biggest problem was cutting holes for the 4" duct down the port side. I borrowed a 90 degree 1/2" drill and hole saw and cut 4 1/4" holes in all the bulkheads down the port side before I found that 4" duct needed a 4 1/2" hole to fit. I was able to enlarge each hole, but it wasn't easy. I guess I should have tried the duct through a test hole before drilling. Surprisingly, the 6” duct fit through a 6” hole. | ||
| + | |||
| + | |||
| + | <gallery heights=210px widths=300px perrow=2> | ||
| + | |||
| + | image:11AC-Yet-To-Be-14678.jpg|The other side of the "Y" behind the chart table continues out the aft side of the hanging locker behind the hull liner in the head. If you remove the compartment where the toilet paper holder is, you can get access to this area. I used another "Y" to split off a 4" round duct in the head and continued the other side to the aft cabin. | ||
| + | |||
| + | image:12AC-Yet-To-Be-14679.jpg|The 4" round duct in the aft cabin is in the top, port corner of the forward bulkhead behind the head sink. | ||
| + | </gallery> | ||
| + | |||
| + | I can adjust the dampers in the vents over the chart table and in the head to direct more or less air to the aft cabin. We sleep forward in the V-berth, so the aft cabin is usually used for storage unless we have guests on board. I used rubber pads to isolate the A/C from the mounting platform and the platform from the hull, so the noise and vibration in the V-berth is only a mild hum. It has not been a problem sleeping. | ||
| + | |||
| + | I was able to find a 15A breaker that matches the other AC breakers in the electrical panel and wired the A/C to that. Everything runs on the original, 30A shore power. I looked at Mermaid's Condensator to siphon the condensate overboard, but it looked to me like seawater could come back into the boat through it. Since my drain is pretty far up in the bow and gets hit by waves when underway, I decided not to use it and I ran a drain tube back to the bilge sump in front of the mast. I usually have a little water in the sump anyway because of the keel-stepped mast. | ||
| + | |||
| + | We have been very pleased with the A/C performance. If we have guests on board, we partially close the chart table and head vents and the aft cabin cools nicely. We used a reverse cycle unit and we even took advantage of the heat a couple of times this winter. The hinge down return air grill to give easy access to the remaining under the V-berth storage was an added bonus. With cool air ducted to every cabin and minimal impact on storage space, we’re more than happy with the results. | ||
| + | |||
| + | |||
| + | ==Alternate Forepeak Installation== | ||
| + | '''Mike and Jan Smith, ''Breezer'' #688 (1988)''' | ||
| + | |||
| + | I decided to install a small Mermaid M5 5200 BTU air conditioner to cool the forepeak area while we are at anchor overnight. This is how I installed a ¾” marine plywood shelf underneath the forepeak using West System materials to hold the air conditioner and accessories. I wanted the shelf to be 18” forward of the forepeak bulkhead, mounted on the centerline of the boat, and 6” off the forepeak sole. I removed the forepeak cushions and storage compartment insets. I used a 3'x2' piece of cardboard to make a template to be used to cut out the shelf. I centered and squared the cardboard with the longer dimension athwart ships and pushed it forward until the two forward corners touched the sides of the hull. I drew lines on both port and starboard ends of the piece of cardboard parallel to the hull about 1' in from the edge to approximate the hull angle and then cut the template out with a pair of scissors. I test fit the template below the forepeak using a two way level and it needed only minor trimming. I traced the template onto a piece of precut 2'x4', 3/4 marine plywood from Lowe's. I cut the shelf out with a circular saw and angled the outboard edges at 30 degrees to approximate the hull flare and checked the fit of the shelf with the two way level. I used 3M Adhesive Remover to clean the hull mounting surfaces and scuffed them with a wire brush. I used a thick bead of 3M 4200 adhesive along each outboard edge and fit the shelf again. I had to lightly shim the shelf at two places to get it level. Using a disposable brush I wet out an area about 3 ½” inside the outboard ends of the shelf and up about 3 ½” on the hull with a mixture of West System epoxy and Fast Cure hardener. I set two layers of 6" x 22" saturated fiberglass tape applied about 2 hours apart along each joint, giving me an equal 3" overlap on the shelf and hull surfaces. I epoxied the entire top surface of the platform for appearance. After it cured overnight, I trimmed the rough edges of the shelf a bit, sanded the top surface smooth with an orbital sander. I painted it white with epoxy paint, and the shelf was ready for the air conditioner to be mounted. | ||
Revision as of 21:37, 1 February 2009
Contents
By Bonnie Mitchell "Oraios" #575
We have a Cruise Air 12,000 BTU unit. It was installed by the dealer we bought the boat from back in 1987. It was installed in the hanging locker in the main salon and does take up most of the space. Here are a few pictures of the installation. We have had to cover the hatches if we needed to be comfortable during the day in the middle of July in a hot harbor in SW Florida. It is big enough to keep the entire boat comfortable at night for sleeping during the summer months here with the addition of a couple of fans in the front and rear cabins.
- Click any image to enlarge
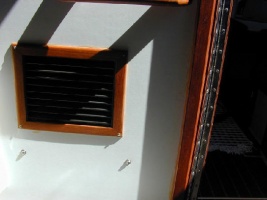
Return grille in the head of 34. (Shadow makes it look strange)
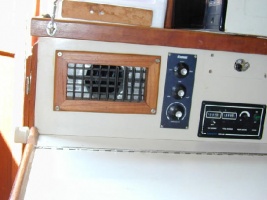
Supply grille at chart table of 34 with controls for the unit installed next to it


- 12000 BTU Cruiseair unit installed in hanging locker of Oraios


Forepeak installation
Karen and Terry Clark, Yet To Be #1095
Southwest Florida has wonderful cruising grounds, but it can be a little hot in the summer, especially in marinas where we can’t swing into the wind. After two summers here, we finally decided to install A/C in Yet To Be, our 1990 C34. Even though we sleep forward in the V-berth, we wanted to cool the aft cabin also for our occasional overnight guests. We also wanted to preserve as much storage space as possible since the C34 doesn’t ever seem to have enough. After looking at several installations, we decided to put the A/C unit under the V-berth and run a duct down the port side to the aft cabin.
We selected a Mermaid 16,500 BTU side discharge air conditioner because it was one of the smaller units available and Mermaid is manufactured in nearby Fort Myers. The weight of the A/C unit far up in the bow doesn’t seem to have made much difference in the sailing of the boat, but we don’t race any more either.
- Yet-to-Be's forepeak installation
I glassed in a platform as high and as far forward under the V-berth as the A/C would fit to preserve some storage in the aft end of the compartment. I replaced the drawer unit with a custom return air grill mounted on hinges to give easier access, and it's worked out great. However, you do have to be careful not to allow anything stored to stick up above the grill to block the return air.

The A/C is a side discharge unit mounted fore/aft on the platform with the water pump right beside it on the platform. The electrical control box is mounted on the same platform opposite the water pump. The through hull is under the small floor panel just to port and forward of the mast. Water discharge is as high as possible under the V-berth on port side near A/C, about 6" above the waterline.
For the supply air, I used a "T" splitter directly aft from the A/C with 6" to starboard and 4" to port. The 6" goes through the forward hanging locker and up to a 6" to 4x10" transition fitting from Home Depot which connects to a 4x10" hole in the counter top above the hanging locker. We can still hang clothes in front of the 6" duct. I built a teak plenum box about 5x12x12", open on the back and bottom, that fits over the hole and against the bulkhead.
There is an 8x10" grill in the bulkhead opening into the main cabin and a 4" round vent in the plenum opening into the forward cabin. That takes care of the 6" side.


The 4" side from the A/C runs through the lower compartment on the forward cabin port side,
through the upper, outboard corner of the forward under settee storage compartment in the main cabin,

along the top, outboard corner of the holding tank to the open area near the macerator pump.
I used a length of 4" rigid aluminum duct to span the area under the chart table since it was likely to get kicked. It is wrapped in a piece of vinyl that matches the hull liner color and is not very noticeable.
I switched back to 4" flex duct in the aft hanging locker (there were already slide out baskets in this locker - see the Shelves for nav. closet project)

and used a "Y" to split off a 4" round vent over the chart table into the main cabin. I also mounted the thermostat over the chart table but away from the vent.


The biggest problem was cutting holes for the 4" duct down the port side. I borrowed a 90 degree 1/2" drill and hole saw and cut 4 1/4" holes in all the bulkheads down the port side before I found that 4" duct needed a 4 1/2" hole to fit. I was able to enlarge each hole, but it wasn't easy. I guess I should have tried the duct through a test hole before drilling. Surprisingly, the 6” duct fit through a 6” hole.
The other side of the "Y" behind the chart table continues out the aft side of the hanging locker behind the hull liner in the head. If you remove the compartment where the toilet paper holder is, you can get access to this area. I used another "Y" to split off a 4" round duct in the head and continued the other side to the aft cabin.
The 4" round duct in the aft cabin is in the top, port corner of the forward bulkhead behind the head sink.


I can adjust the dampers in the vents over the chart table and in the head to direct more or less air to the aft cabin. We sleep forward in the V-berth, so the aft cabin is usually used for storage unless we have guests on board. I used rubber pads to isolate the A/C from the mounting platform and the platform from the hull, so the noise and vibration in the V-berth is only a mild hum. It has not been a problem sleeping.
I was able to find a 15A breaker that matches the other AC breakers in the electrical panel and wired the A/C to that. Everything runs on the original, 30A shore power. I looked at Mermaid's Condensator to siphon the condensate overboard, but it looked to me like seawater could come back into the boat through it. Since my drain is pretty far up in the bow and gets hit by waves when underway, I decided not to use it and I ran a drain tube back to the bilge sump in front of the mast. I usually have a little water in the sump anyway because of the keel-stepped mast.
We have been very pleased with the A/C performance. If we have guests on board, we partially close the chart table and head vents and the aft cabin cools nicely. We used a reverse cycle unit and we even took advantage of the heat a couple of times this winter. The hinge down return air grill to give easy access to the remaining under the V-berth storage was an added bonus. With cool air ducted to every cabin and minimal impact on storage space, we’re more than happy with the results.
Alternate Forepeak Installation
Mike and Jan Smith, Breezer #688 (1988)
I decided to install a small Mermaid M5 5200 BTU air conditioner to cool the forepeak area while we are at anchor overnight. This is how I installed a ¾” marine plywood shelf underneath the forepeak using West System materials to hold the air conditioner and accessories. I wanted the shelf to be 18” forward of the forepeak bulkhead, mounted on the centerline of the boat, and 6” off the forepeak sole. I removed the forepeak cushions and storage compartment insets. I used a 3'x2' piece of cardboard to make a template to be used to cut out the shelf. I centered and squared the cardboard with the longer dimension athwart ships and pushed it forward until the two forward corners touched the sides of the hull. I drew lines on both port and starboard ends of the piece of cardboard parallel to the hull about 1' in from the edge to approximate the hull angle and then cut the template out with a pair of scissors. I test fit the template below the forepeak using a two way level and it needed only minor trimming. I traced the template onto a piece of precut 2'x4', 3/4 marine plywood from Lowe's. I cut the shelf out with a circular saw and angled the outboard edges at 30 degrees to approximate the hull flare and checked the fit of the shelf with the two way level. I used 3M Adhesive Remover to clean the hull mounting surfaces and scuffed them with a wire brush. I used a thick bead of 3M 4200 adhesive along each outboard edge and fit the shelf again. I had to lightly shim the shelf at two places to get it level. Using a disposable brush I wet out an area about 3 ½” inside the outboard ends of the shelf and up about 3 ½” on the hull with a mixture of West System epoxy and Fast Cure hardener. I set two layers of 6" x 22" saturated fiberglass tape applied about 2 hours apart along each joint, giving me an equal 3" overlap on the shelf and hull surfaces. I epoxied the entire top surface of the platform for appearance. After it cured overnight, I trimmed the rough edges of the shelf a bit, sanded the top surface smooth with an orbital sander. I painted it white with epoxy paint, and the shelf was ready for the air conditioner to be mounted.