Hanging Shelves & Glass Holders
Hanging galley shelf with integrated 12v halogen light installation
Capt Al Kindred Spirit
Sailing in the northeast area gives us a chance to use our boat for a very short four months in the summer and leaves us with a lot of months on the hard. This does allow me to do projects that would not normally get done. After spending summer evenings in our C34 we found that the lighting at the galley counter and sink area ......well, stinks. So as the boat was hauled and the magazines came out....let's see what other boats have done to solve this problem. I determined the choices were few. Stu, of "Aquavite," had the idea of running teak molding to cover the wires for a 12v-halogen light over the sink. Great idea...as I continued to look I came across a galley picture of a new Catalina.
They all have a small shelf over the counter stopping short of the sink. This shelf has a stainless bar supporting or hanging the end of the shelf from the cabin roof. The idea of the shelf and the light together is what this upgrade is about. So why can't the older C34s have this shelf also. Some owners have added a microwave or cabin roof mounted cabinets. Feb 99 MainSheet has the microwave unit pictured.
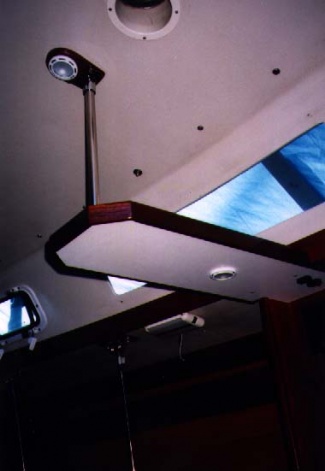
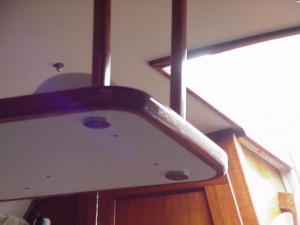
I chose to build a plain shelf, to leave the cabin with the open look. I started by making a cardboard template 102 wide by 302 long. Four inches of the length slides underneath the deck jog back to the upper galley cabinet. The 262 exposed length brings it to the edge of the sink and the 102 width allows the mate to use the ice box without hitting his/her head. A notch for the small bulkhead wall is made in the forward rear corner to allow the shelf to be flush with the seat back of the dinnette area. After proper testing this was transferred to 3/4 inch plywood that I covered with white Formica to match the counter top. The edges of this shelf were covered to match the counter teak edge.....Including the 45-degree edges on the front corners. I purchased a short piece for 7/8-inch stainless tube and two rail ends to connect the shelf to the ceiling. That was the simple part...It looks like the 98 model shelf, now how did I incorporate the lighting?
Before the Formica was glued to the shelf, I put a 3/4 inch wide 1/4 inch deep groove from the cabinet edge of the board across to where the stainless tube goes up to the ceiling. The wire from the old galley fluorescent light travels down this groove and up the stainless tube and out to a 12v halogen light that is mounted on the ceiling in a teak block. (See Upgrade Article on Block at Ceiling Holing Halogen Light) A switch was mounted under the shelf back by the cabinet. The wires to this switch run up to the groove to break the hot-wire to the light. To solve the dark counter problem at the ice box area, I drilled through the 3/4 inch shelf with a 2 1/82 hole saw and recessed in another 12v halogen light with its wires running in a second groove. The wires are placed on these grooves and the Formica is glued to the shelf. With luck you could Formica and snake the wires in afterwards.
The shelf is screwed up into the bottom of the rain-drain-teak, so it is basically self-supporting. The stainless tubing is additional support and a hiding spot for the wires. See pictures above for more information on this process.
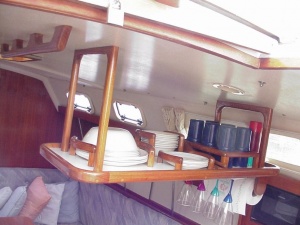
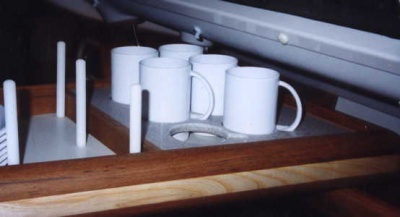
Now the question is how do we store things on this shelf without having to remove it all to go sailing. An insert and pins as shown in this picture would do the trick. This is not my boat but a picture of a shelf on a new boat.
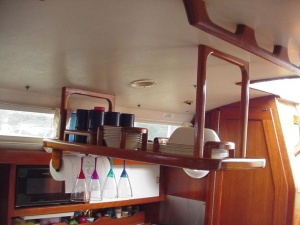
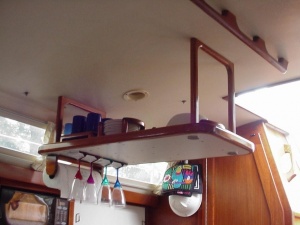
An alternative hanging shelf
The shelf is super strong - the strength comes from having a threaded rod with end plates on both ends. We have made several crossings to and from the Bahamas with seas up to eight feet. We never lost a dish. Picture on the bottom right shows the support on the bottom of the threaded rod. A similar plate is attached above under the slide for the companionway. Installation requires removing the companionway slide to install the top braces and reinstalling the slide. The treaded rods are covered with teak and the supports for the dishes are teak.
- Click any image to enlarge

