Intro
The following are the steps I developed when installing service kits for my two Whale Gusher Galley Mk 3 foot pumps. These pumps have been manufactured since 1984, so I suspect they will be found on most all of our boats. The service kit is part number AK0553. It is widely available. I bought my kits on eBay. They looked like old stock, but the parts were fine. I have serviced two pumps, so I have limited experience. The following procedures worked for me. But, they may not all be correct (please mention any needed corrections) and certainly are not the sole way to accomplish this task.
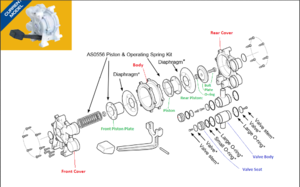
Naming Parts
|
I found a pump exploded view with names for most of the kit parts. I could not find a view which names each pump part. So, I made up some part names to help with my description. My inventions are listed below and shown in Figure 1:
- Pump body parts:
- Front cover
- Body
- Rear cover
- Piston parts:
- Font piston plate
- Piston
- Rear piston plate
- Piston bolt
- Piston bolt O-ring/gasket
- Valve assembly parts:
Disassembly
- Remove four screws at pump lever. Keep these screws separate for reassembly. They are ¼” shorter than the front and rear cover screws. See Figure 2.
- Remove rear cover. Remove the six rear cover screws. Front and rear cover screws are the same size and can be co-mingled for reassembly. Pry the rear cover from the pump. The large O-rings on the valve bodies make pressure fits on the rear and front covers. See Figure 3.
- Remove valve assemblies. Remove the upper and lower valve assemblies. Set them aside for later disassembly.
- Remove rear diaphragm. Remove piston bolt, rear piston plate and piston bolt O-ring/gasket. The O-ring/gasket will be replaced and can be discarded. The diaphragm is likely pressed tightly to the piston and body. Pry the diaphragm loose from the piston with a small screwdriver, then pull the diaphragm away from the body. See Figure 4.
- Remove front cover and spring. The front cover is subject to spring force. Hold the pump down on your work surface or clamp the body and front cover together. Remove the front cover screws and the front cover from the body. Remove the spring. See Figure 5.
- Remove front diaphragm. Remove the front piston plate from the piston. Pry the front diaphragm from the body. The piston can be left in the body. There is no front or back to the piston. If it falls out during handling, it can be reinstalled in either direction.
|
<gallery perrow=2 caption="Click on thumbnails to enlarge">
image:Remove_Lever_Screws.JPG|Figure 2
image:Remove_Rear_Cover.JPG|Figure 3
image:Pry_Off_Diaphragm.JPG|Figure 4
|
