Difference between revisions of "Plain language "How to Wiki" guide"
| Line 13: | Line 13: | ||
To add your information, at the top of the page select the edit tab. The page will refresh with an editing window open. You will now see the “code” that describes the page. | To add your information, at the top of the page select the edit tab. The page will refresh with an editing window open. You will now see the “code” that describes the page. | ||
| + | |||
[[Image:UG2 (Medium).jpg ]] | [[Image:UG2 (Medium).jpg ]] | ||
| Line 23: | Line 24: | ||
I’ve added a new section titled xx and some information as shown in the next screen shot. | I’ve added a new section titled xx and some information as shown in the next screen shot. | ||
| − | + | [[Image:UG3 (Medium).jpg ]] | |
As you can see I included an image as part of my information. Don’t forget to save your new page before the next step. To add a picture is a 2 step process. | As you can see I included an image as part of my information. Don’t forget to save your new page before the next step. To add a picture is a 2 step process. | ||
| Line 29: | Line 30: | ||
First use the “upload File” link in the left margin. The recommended picture size is 150KB or less. If yours is larger use a picture editor or the Microsoft Power Tool image resizer to reduce the size. Use the browse button to find the correct file, use the same name or make up a new one for the destination file name. It must be a unique name. At this point I copy the destination file name onto the clipboard. Use the button to upload your file. | First use the “upload File” link in the left margin. The recommended picture size is 150KB or less. If yours is larger use a picture editor or the Microsoft Power Tool image resizer to reduce the size. Use the browse button to find the correct file, use the same name or make up a new one for the destination file name. It must be a unique name. At this point I copy the destination file name onto the clipboard. Use the button to upload your file. | ||
| − | Next return to your new content. Place the curser where you want to insert your image. Use the image tool button it insert the code. Replace “example.jpg” with the destination file name you copied in step one. | + | Next return to your new content. Place the curser where you want to insert your image. Use the image tool button it insert the code. Replace “example.jpg” with the destination file name you copied in step one. You can use the show preview button to see what the new content will look like. |
| − | |||
| − | |||
| − | |||
| − | |||
| − | |||
| − | |||
| − | |||
| − | |||
| − | |||
| − | |||
| − | |||
| − | |||
| − | You can use the show preview button to see what the new content will look like. | ||
| − | |||
| + | [[Image:UG4 (Medium).jpg ]] | ||
| − | |||
| − | |||
| − | |||
| − | |||
| − | |||
| − | |||
| − | |||
| − | |||
| − | |||
| − | |||
| − | |||
| − | |||
| − | |||
| − | |||
| − | |||
| − | |||
| − | |||
| − | |||
| − | |||
| − | |||
| − | |||
In many instances it makes sense to add your new content in several places. Let’s say you just installed a new stereo at the nav station with speakers in the salon and cockpit. It could be placed in any or all of these subjects: Cockpit, Interior, Electronics or Miscellaneous. A great feature about this Wiki format is that links to specific pages are automatic. Since we are working in the Cockpit section, I’ll insert a new page there. To insert a new page use the [[ ]] format. I just added a [[My New Stereo]] page to the xx section on the Cockpit page, this is the preview view. | In many instances it makes sense to add your new content in several places. Let’s say you just installed a new stereo at the nav station with speakers in the salon and cockpit. It could be placed in any or all of these subjects: Cockpit, Interior, Electronics or Miscellaneous. A great feature about this Wiki format is that links to specific pages are automatic. Since we are working in the Cockpit section, I’ll insert a new page there. To insert a new page use the [[ ]] format. I just added a [[My New Stereo]] page to the xx section on the Cockpit page, this is the preview view. | ||
| − | + | [[Image:UG5 (Medium).jpg ]] | |
| − | |||
| − | |||
| − | |||
| − | |||
Save your new page, when the page refreshes, enter your new page by clicking on the link. A blank editing window opens. Enter your information just as we did above. | Save your new page, when the page refreshes, enter your new page by clicking on the link. A blank editing window opens. Enter your information just as we did above. | ||
| + | [[Image:UG6 (Medium).jpg ]] | ||
| − | As an example I’ll provide a link to the great website where I purchased my new sound system. You can use the external link button or use this format: [ URL (space) Display name] In this example it is: [http://www.radioshack.com/home/index.jsp Radio Shack] Leave a space between .jsp and Radio. | + | As an example I’ll provide a link to the great website where I purchased my new sound system. You can use the external link button or use this format: [ URL (space) Display name] In this example it is: [http://www.radioshack.com/home/index.jsp Radio Shack] Leave a space between .jsp and Radio. It looks like this. Notice how the information looks in the preview view above the editing box. |
| − | |||
| − | |||
| − | |||
| − | |||
| − | |||
| − | + | [[Image:UG7 (Medium).jpg ]] | |
| − | |||
| − | |||
| − | |||
| − | |||
| − | |||
| − | |||
| − | |||
| − | |||
| − | |||
| − | |||
| − | |||
| − | |||
| − | |||
| − | |||
| − | |||
| − | |||
After you complete filling in all your new content save your new page. | After you complete filling in all your new content save your new page. | ||
| Line 107: | Line 50: | ||
This is a unique page. We built it off the Cockpit page, but it should also be referenced on the Interior, Electronics and Miscellaneous pages. Since the page is built, simply go to each of the Sections and in an appropriate place add [[My New Stereo]] | This is a unique page. We built it off the Cockpit page, but it should also be referenced on the Interior, Electronics and Miscellaneous pages. Since the page is built, simply go to each of the Sections and in an appropriate place add [[My New Stereo]] | ||
| − | + | [[Image:UG8 (Medium).jpg ]] | |
I’ve added it to the electronics page. The link is automatic, your information is available on any page you insert [[My New Stereo]] but you only had to build one page! | I’ve added it to the electronics page. The link is automatic, your information is available on any page you insert [[My New Stereo]] but you only had to build one page! | ||
Revision as of 20:09, 19 June 2008
Plain language how to guide
You must be logged in to add content to the wiki. Log in is supposed to be automatic, if not it is the same username and password you use on the message board.
The two basic ways to add content are to add to an existing page or to start a new page.
The first step is to decide the where you want to add your information. It should fit into one of the 28 subject areas we have started. If you really think you need an additional subject area please email the webmaster with your request. sanner@big.net
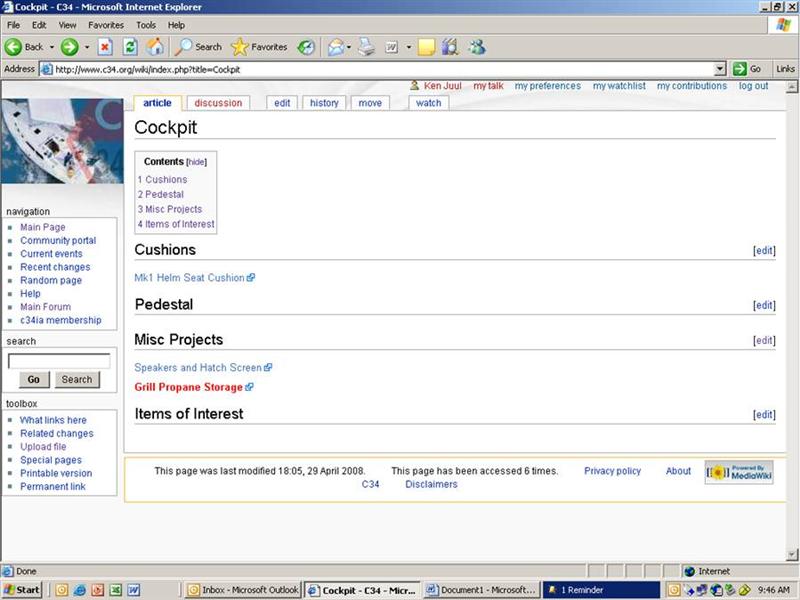
After you decide where the information will reside, go to that page. I’ll use the Cockpit subject as an example. The page is described in the Contents box, this page has 4 sections (Cushions, Pedestal, Misc Projects, Items of Interest) with content in two of them.
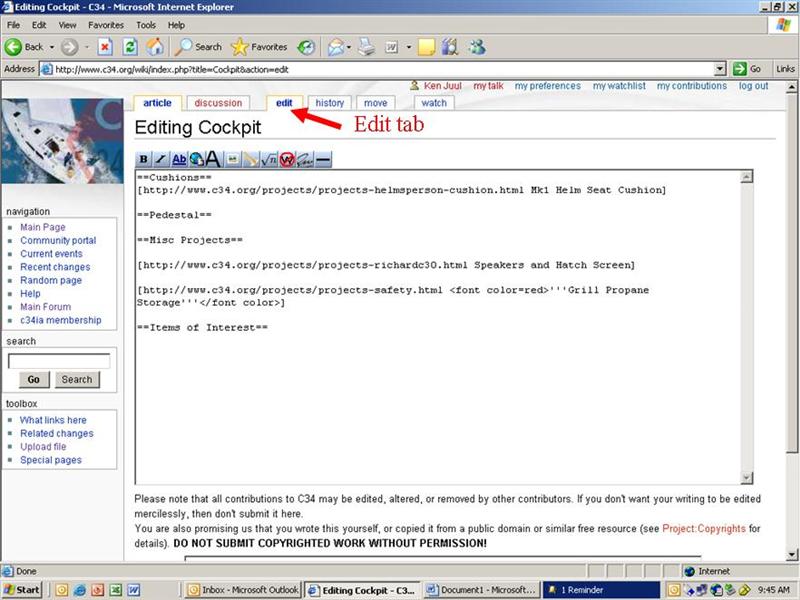
To add your information, at the top of the page select the edit tab. The page will refresh with an editing window open. You will now see the “code” that describes the page.
If you want to start a new section on this page (i.e. Cushion, Pedestal, etc) put your new title inside
= xxx =
To add content to your new section, or any other section, place your cursor at the end of the input above where you want to place yours and hit enter twice.
Start typing or paste your new content. You can use the buttons at the top of the edit window to help format your new content. Remember to Save your work before changing windows.
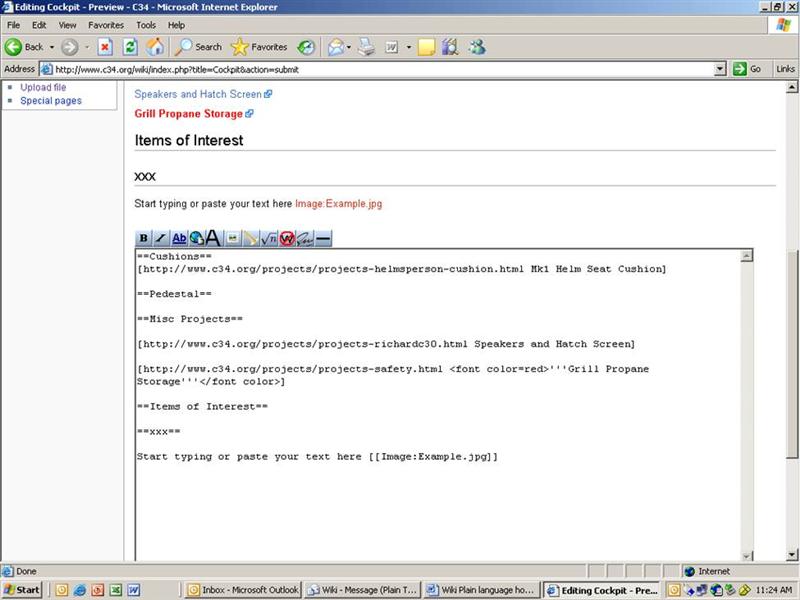
I’ve added a new section titled xx and some information as shown in the next screen shot.
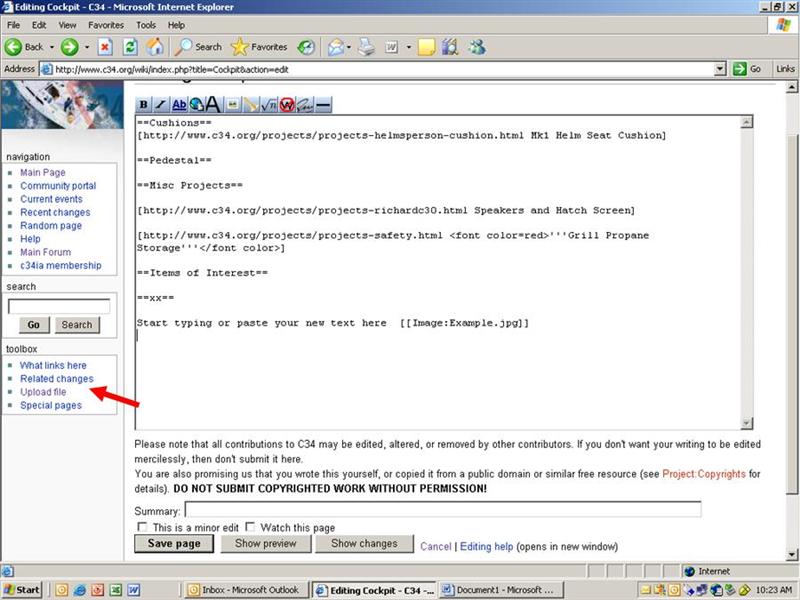
As you can see I included an image as part of my information. Don’t forget to save your new page before the next step. To add a picture is a 2 step process.
First use the “upload File” link in the left margin. The recommended picture size is 150KB or less. If yours is larger use a picture editor or the Microsoft Power Tool image resizer to reduce the size. Use the browse button to find the correct file, use the same name or make up a new one for the destination file name. It must be a unique name. At this point I copy the destination file name onto the clipboard. Use the button to upload your file.
Next return to your new content. Place the curser where you want to insert your image. Use the image tool button it insert the code. Replace “example.jpg” with the destination file name you copied in step one. You can use the show preview button to see what the new content will look like.
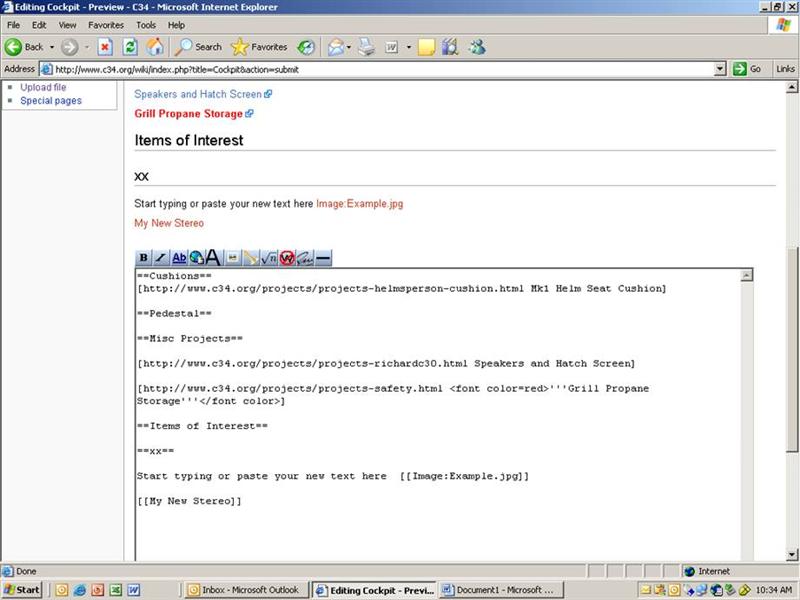
In many instances it makes sense to add your new content in several places. Let’s say you just installed a new stereo at the nav station with speakers in the salon and cockpit. It could be placed in any or all of these subjects: Cockpit, Interior, Electronics or Miscellaneous. A great feature about this Wiki format is that links to specific pages are automatic. Since we are working in the Cockpit section, I’ll insert a new page there. To insert a new page use the [[ ]] format. I just added a My New Stereo page to the xx section on the Cockpit page, this is the preview view.
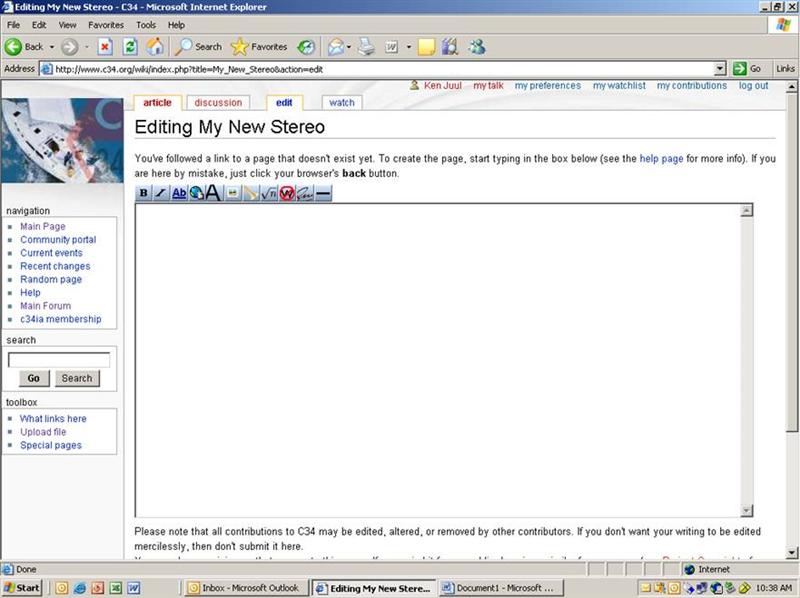
Save your new page, when the page refreshes, enter your new page by clicking on the link. A blank editing window opens. Enter your information just as we did above.
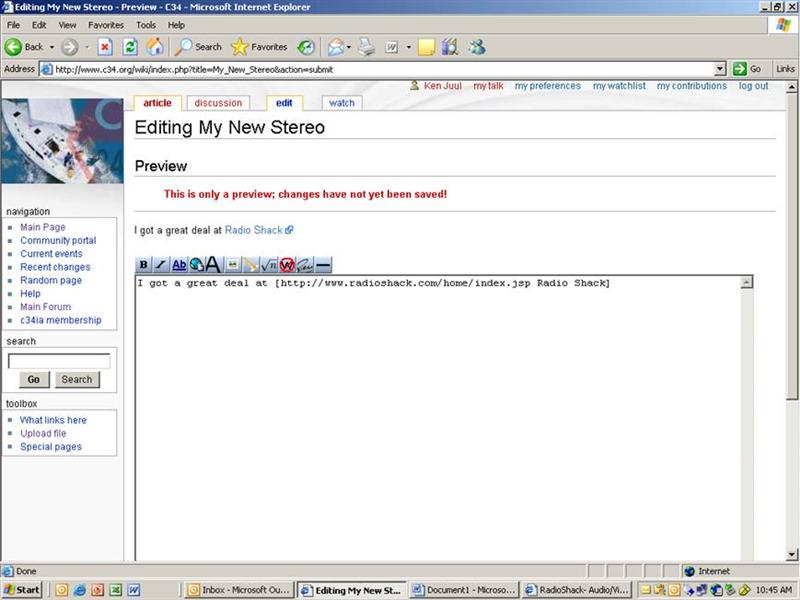
As an example I’ll provide a link to the great website where I purchased my new sound system. You can use the external link button or use this format: [ URL (space) Display name] In this example it is: Radio Shack Leave a space between .jsp and Radio. It looks like this. Notice how the information looks in the preview view above the editing box.
After you complete filling in all your new content save your new page.
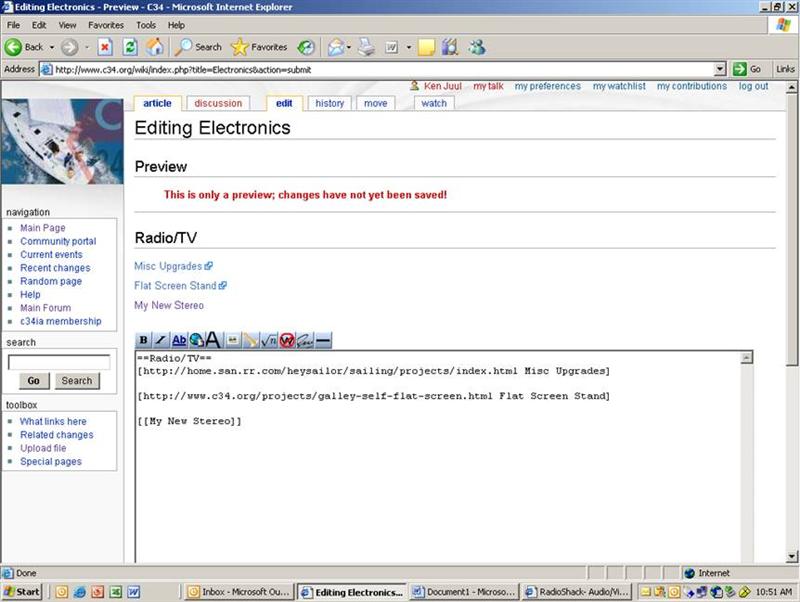
This is a unique page. We built it off the Cockpit page, but it should also be referenced on the Interior, Electronics and Miscellaneous pages. Since the page is built, simply go to each of the Sections and in an appropriate place add My New Stereo
I’ve added it to the electronics page. The link is automatic, your information is available on any page you insert My New Stereo but you only had to build one page!
Don’t forget to SAVE each page when you are done!
After I finished the screen shots I deleted the added information so it will not be found on any of the subject pages. If you have comments for improving this tutorial please send them to kenandvic@cox.net Or you can write your own “how to tips” and add them to the How to add Content page.
