Difference between revisions of "Teak Tables"
Stu Jackson (talk | contribs) |
|||
| (13 intermediate revisions by 4 users not shown) | |||
| Line 1: | Line 1: | ||
| + | ==A few approaches to smaller, more manageable saloon tables== | ||
| + | |||
| + | ===Stu's Approach:=== | ||
| + | |||
| + | See Tech Note: Spring 2018 Online Mainsheet Password: S361 | ||
| + | |||
| + | More photos are available in the Forum, search on: saloon or salon table | ||
| + | |||
| + | |||
| + | ===Apache's modest cut=== | ||
| + | '''By Ron Hill, ''[[Apache]]'' #788''' | ||
| + | |||
| + | |||
| + | The key to cutting the table is to take it to someone that makes countertops. They have the saw/blade that'll cut Formica without chipping it. If there's any cost it will be nominal. To cover the cut thru the plywood I cut and epoxy'd on a thin strip of teak. I think it looks better than just staining the plywood cut to match. Catalina use much more teak on the 1986 - 1988 tables. In 1989 the amount of teak started to decline and edging (as an example) was replace with Formica strips. The two halves are held together with stainless piano hinge. I made my "sliders" out of hard board that I had on hand. Metal will also work. I banded a small piece of bungee cord with a small loop around the table elevation knob. The loop slips into an open brass eye, screwed to the table underside. That way the table is secured when it's down and we're under sail. | ||
| + | |||
| + | The 8" side is the length between the bottom of the table and the cushion so it would clear. The 12" side is so I had more room on the isle side when the table was down and that leaf still cleared my waste basket. The waste basket is just aft of the mast being secured to the mast and the table column. I've also seen tables with a cut that was parallel to the outside edge. | ||
| + | |||
| + | I've seen a lot of table modifications in the past 15 years, but this is the only one I liked. I kept my promise to my First Mate, that HER table could still be made back into it's original full size. | ||
| + | |||
| + | <gallery caption="Click any image to enlarge" widths="200px" heights="210px" perrow=3> | ||
| + | image:TableModification3.gif|Plans | ||
| + | image:TableModification1.jpg|In-progress | ||
| + | image:TableModification2.jpg|Completed | ||
| + | </gallery> | ||
| + | |||
| + | |||
| + | ===Quiet Island=== | ||
| + | [[image:Dinette1.jpg|border|350px|right]][[image:Dinette2.jpg|border|350px|right]] | ||
| + | '''By Bob & Cheryl Kuba, ''[[Quiet Island]]'' #1291 (1994)''' | ||
| + | |||
| + | Here's a more practical Dinette table. If we plan to have more guests than the v-berth and aft stateroom can handle, the original table can be re-installed for the additional sleeping space. It sure makes it easier to access the storage areas! | ||
| + | |||
| + | I re-cycled an old kitchen table top by shaping it to the size that looked proportional by cutting it with a jigsaw. Then, after roughing up the original Formica top with sandpaper, I used a brush-on contact cement, and glued a piece of 1/8" birch plywood to the top. I left a small overhang around the edges so I could sand it down to the same size as the table base below it. Contact cement is very unforgiving, and if you don't position your project exactly right on the first try, it's impossible to remove. So I left myself a margin for error, and then just sanded it down. | ||
| + | |||
| + | I experimented on a scrap piece of the birch plywood, and after mixing a blend of oak and red mahogany wood stains, I stained it to match the interior wood shade. It took 3-tries to get something I was happy with. | ||
| + | |||
| + | To give it a finished look, I bought some rounded teak corners and straight teak edge molding and attached it to the edges using a waterproof wood glue, Titebond II. The hard part was getting all the pieces to fit flush up against each other, but that's just a matter of fitting, sanding, fitting, and then sanding again to get that perfect fit. | ||
| + | |||
| + | Then it was five coats of marine spar varnish. | ||
| + | |||
| + | After a season of cruising its held up well. Although, this winter I think I am going to pour a layer of self-leveling clear resin over the surface to better protect it. It's a product called EnviroTex Lite, and can be found at most paint stores, or at www.eti-usa.com | ||
| + | |||
| + | <br> | ||
| + | <br> | ||
| + | <br> | ||
| + | <br> | ||
| + | <br> | ||
| + | ---- | ||
| + | ===Juliana's trimmed table=== | ||
| + | '''By Bryan Pfaffenberger, ''[[Juliana]]'', #680''' | ||
| + | |||
| + | |||
Older C34s are equipped with a Formica-covered table. Designed to lower in order to transform the settee into a double berth, the table is too large to allow sitters to enter the settee comfortably. | Older C34s are equipped with a Formica-covered table. Designed to lower in order to transform the settee into a double berth, the table is too large to allow sitters to enter the settee comfortably. | ||
| Line 4: | Line 56: | ||
Constructed by a master woodworker in Hampton, Virginia, the table is solid 5/8" teak and adds greatly to the boat's interior beauty. | Constructed by a master woodworker in Hampton, Virginia, the table is solid 5/8" teak and adds greatly to the boat's interior beauty. | ||
| − | ''' | + | |
| + | |||
| + | ---- | ||
| + | ===Kindred Spirit's "cocktail table"=== | ||
| + | '''By Al and Michele Watson ''[[Kindred Spirit]]'' #55''' | ||
| + | |||
| + | |||
| + | We rafted with another C34 at Block Island and my son mentioned the next day that our boat looked smaller. I assured him we all had the same boat. Well I started thinking (very dangerous when I do that) the only boat difference was he stored his main table aft and had an octagon coffee table in its place. | ||
| + | |||
| + | This made it easier to get to all the storage behind the table. We had also seen another C34 with their table cut and hinged on one side for more room. Both nice ideas along with all those in the MainSheet but I hated to cut the table and the octagon shape was not our style so I continued thinking. | ||
| + | |||
| + | When we got home I took a scrape piece 16 x 25 inch of 1 1/2 inch laminated pine board (doesn't everyone have this in their garage! I do) Now the trick, not round, not 5-6 or 8 sided, hey!!! The top of the house toilet looks about right! Apart came the toilet cover (Michele didn't know that part) and I traced the shape on both ends of the board (went 3/4 inch larger all around to fill the board). I cut the shape out (returned the seat to the toilet). | ||
| + | |||
| + | When we returned to the boat and I removed the large table, stood it on end and put it good side to the wall just inside the aft cabin. Well who wants that ugly underside bracket and plywood showing in the aft. | ||
| + | |||
| + | The idea light bulb lit again. I took the bracket off.....follow me here....turned the table good side out and ran a bungy cord around it to hold it in rough seas. Looks so nice, Michele went into the aft looking for it and did not notice it, the bungy is now another towel rack. OK, now I took the bracket and mounted it to my oval table....put it back on the post,....got funny and added two full place settings and called Michele down for the big test. Boat Looks Bigger!. Much easier to get around to all the hidden storage. The only thing that I now have to do is figure a way to lay the larger table over the smaller and hold it in place. | ||
| + | |||
| + | Possibly, two small type clamps attached to the large table bottom side. I would like to put fiddles at four points around the table but it would hinder the larger table being put back on top for the four person dinner setting. Now the question is how long can I get away with the temporary pine table??? I did put white formica on the top! | ||
| + | |||
| + | <gallery widths="200px" heights="210px" perrow=3> | ||
| + | Image:watson-table1.jpg | ||
| + | Image:watson-table2.jpg | ||
| + | Image:watson-table3.jpg | ||
| + | </gallery> | ||
| + | |||
---- | ---- | ||
| + | ===Espresso's Thai Teak table=== | ||
| + | '''By Craig Illman, ''[[Espresso]]'', #1150''' | ||
| + | |||
I purchased a smaller salon table (21" x31") from www.thaiteakmarine.com. After waiting almost two months for delivery, I finished with eight coats of Top Secret (www.topsecretcoatings.com) one part clear epoxy. I didn't want to remove the spider from the original table in case I wanted to bring it temporarily back aboard, so I picked up another 1-3/4" spider from Cabelas. The smaller table still handles four diners and makes it much easier to access the starboard storage areas. | I purchased a smaller salon table (21" x31") from www.thaiteakmarine.com. After waiting almost two months for delivery, I finished with eight coats of Top Secret (www.topsecretcoatings.com) one part clear epoxy. I didn't want to remove the spider from the original table in case I wanted to bring it temporarily back aboard, so I picked up another 1-3/4" spider from Cabelas. The smaller table still handles four diners and makes it much easier to access the starboard storage areas. | ||
| − | |||
| − | [[Image:teak-table1.jpg]] | + | [[Image:teak-table1.jpg|border|350px]] [[Image:teak-table2.jpg|border|350px]] |
| − | [[Image:teak-table2.jpg]] | + | |
| + | ---- | ||
| + | |||
| + | |||
| + | ===BlackDragon's Table=== | ||
| + | '''by Steve Dolling ''[[BlackDragon]]'' #804''' | ||
| + | |||
| + | I have a new salon table. Actually it's a cockpit table that I made for my old boat re-purposed. Requirements were as follows: | ||
| + | |||
| + | |||
| + | [[Image:table1.jpg|border|left|350px]] | ||
| + | [[Image:tabledrawers.jpg|border|left|350px]] | ||
| + | [[Image:tabledown.jpg|border|left|350px]] | ||
| + | |||
| + | |||
| + | - much smaller than the old table to allow easy movement around | ||
| + | - still usable as a bed | ||
| + | - no complicated folding mechanisms to whack knees | ||
| + | |||
| + | '''Bonus features include the following:''' | ||
| + | |||
| + | - drawers underneath for cutlery and school supplies | ||
| + | - extension to the port side for cocktail placement from the port settee | ||
| + | |||
| + | I took the the old table and added about 3 inches on each side and trimmed it around with black walnut. So it's made of mahogany, maple, birch, walnut, and teak. I recycled the fiddles from the old salon table. The side fiddles (fore and aft actually) are on removable pins. The pins will allow me to make a couple of simple inserts that have a matching alignment of pins so they will drop in easily. Photo 3 shows the fiddles removed as I am measuring up for the inserts. | ||
| + | |||
| + | This table already makes a huge improvement in our enjoyment of the salon. | ||
Latest revision as of 03:48, 12 March 2019
Contents
A few approaches to smaller, more manageable saloon tables
Stu's Approach:
See Tech Note: Spring 2018 Online Mainsheet Password: S361
More photos are available in the Forum, search on: saloon or salon table
Apache's modest cut
By Ron Hill, Apache #788
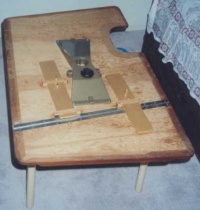
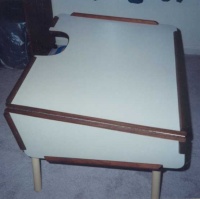
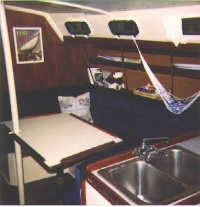
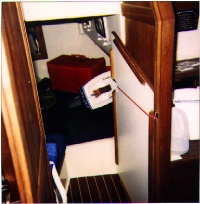
The key to cutting the table is to take it to someone that makes countertops. They have the saw/blade that'll cut Formica without chipping it. If there's any cost it will be nominal. To cover the cut thru the plywood I cut and epoxy'd on a thin strip of teak. I think it looks better than just staining the plywood cut to match. Catalina use much more teak on the 1986 - 1988 tables. In 1989 the amount of teak started to decline and edging (as an example) was replace with Formica strips. The two halves are held together with stainless piano hinge. I made my "sliders" out of hard board that I had on hand. Metal will also work. I banded a small piece of bungee cord with a small loop around the table elevation knob. The loop slips into an open brass eye, screwed to the table underside. That way the table is secured when it's down and we're under sail.
The 8" side is the length between the bottom of the table and the cushion so it would clear. The 12" side is so I had more room on the isle side when the table was down and that leaf still cleared my waste basket. The waste basket is just aft of the mast being secured to the mast and the table column. I've also seen tables with a cut that was parallel to the outside edge.
I've seen a lot of table modifications in the past 15 years, but this is the only one I liked. I kept my promise to my First Mate, that HER table could still be made back into it's original full size.
- Click any image to enlarge
Quiet Island
By Bob & Cheryl Kuba, Quiet Island #1291 (1994)
Here's a more practical Dinette table. If we plan to have more guests than the v-berth and aft stateroom can handle, the original table can be re-installed for the additional sleeping space. It sure makes it easier to access the storage areas!
I re-cycled an old kitchen table top by shaping it to the size that looked proportional by cutting it with a jigsaw. Then, after roughing up the original Formica top with sandpaper, I used a brush-on contact cement, and glued a piece of 1/8" birch plywood to the top. I left a small overhang around the edges so I could sand it down to the same size as the table base below it. Contact cement is very unforgiving, and if you don't position your project exactly right on the first try, it's impossible to remove. So I left myself a margin for error, and then just sanded it down.
I experimented on a scrap piece of the birch plywood, and after mixing a blend of oak and red mahogany wood stains, I stained it to match the interior wood shade. It took 3-tries to get something I was happy with.
To give it a finished look, I bought some rounded teak corners and straight teak edge molding and attached it to the edges using a waterproof wood glue, Titebond II. The hard part was getting all the pieces to fit flush up against each other, but that's just a matter of fitting, sanding, fitting, and then sanding again to get that perfect fit.
Then it was five coats of marine spar varnish.
After a season of cruising its held up well. Although, this winter I think I am going to pour a layer of self-leveling clear resin over the surface to better protect it. It's a product called EnviroTex Lite, and can be found at most paint stores, or at www.eti-usa.com
Juliana's trimmed table
By Bryan Pfaffenberger, Juliana, #680
Older C34s are equipped with a Formica-covered table. Designed to lower in order to transform the settee into a double berth, the table is too large to allow sitters to enter the settee comfortably.
Our new teak table is four inches smaller on three sides (the sides facing the settee), allowing easier ingress and egress.
Constructed by a master woodworker in Hampton, Virginia, the table is solid 5/8" teak and adds greatly to the boat's interior beauty.
Kindred Spirit's "cocktail table"
By Al and Michele Watson Kindred Spirit #55
We rafted with another C34 at Block Island and my son mentioned the next day that our boat looked smaller. I assured him we all had the same boat. Well I started thinking (very dangerous when I do that) the only boat difference was he stored his main table aft and had an octagon coffee table in its place.
This made it easier to get to all the storage behind the table. We had also seen another C34 with their table cut and hinged on one side for more room. Both nice ideas along with all those in the MainSheet but I hated to cut the table and the octagon shape was not our style so I continued thinking.
When we got home I took a scrape piece 16 x 25 inch of 1 1/2 inch laminated pine board (doesn't everyone have this in their garage! I do) Now the trick, not round, not 5-6 or 8 sided, hey!!! The top of the house toilet looks about right! Apart came the toilet cover (Michele didn't know that part) and I traced the shape on both ends of the board (went 3/4 inch larger all around to fill the board). I cut the shape out (returned the seat to the toilet).
When we returned to the boat and I removed the large table, stood it on end and put it good side to the wall just inside the aft cabin. Well who wants that ugly underside bracket and plywood showing in the aft.
The idea light bulb lit again. I took the bracket off.....follow me here....turned the table good side out and ran a bungy cord around it to hold it in rough seas. Looks so nice, Michele went into the aft looking for it and did not notice it, the bungy is now another towel rack. OK, now I took the bracket and mounted it to my oval table....put it back on the post,....got funny and added two full place settings and called Michele down for the big test. Boat Looks Bigger!. Much easier to get around to all the hidden storage. The only thing that I now have to do is figure a way to lay the larger table over the smaller and hold it in place.
Possibly, two small type clamps attached to the large table bottom side. I would like to put fiddles at four points around the table but it would hinder the larger table being put back on top for the four person dinner setting. Now the question is how long can I get away with the temporary pine table??? I did put white formica on the top!
Espresso's Thai Teak table
By Craig Illman, Espresso, #1150
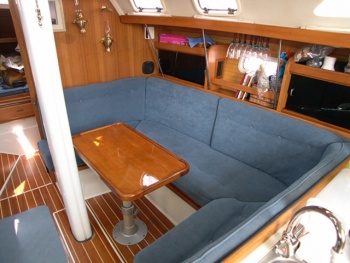
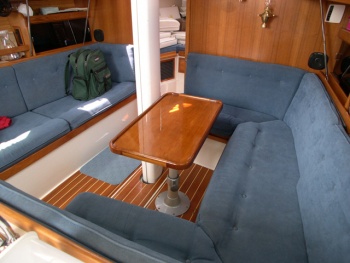
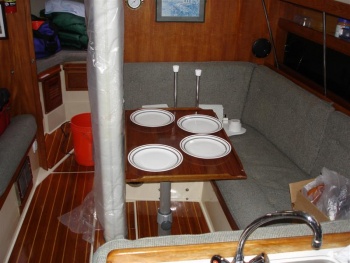
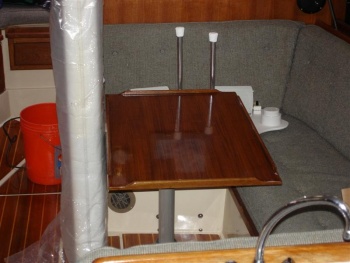
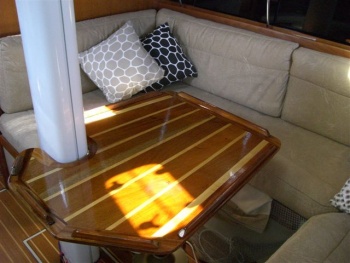
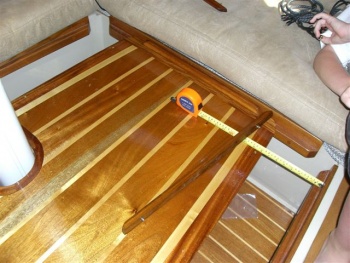
I purchased a smaller salon table (21" x31") from www.thaiteakmarine.com. After waiting almost two months for delivery, I finished with eight coats of Top Secret (www.topsecretcoatings.com) one part clear epoxy. I didn't want to remove the spider from the original table in case I wanted to bring it temporarily back aboard, so I picked up another 1-3/4" spider from Cabelas. The smaller table still handles four diners and makes it much easier to access the starboard storage areas.
BlackDragon's Table
by Steve Dolling BlackDragon #804
I have a new salon table. Actually it's a cockpit table that I made for my old boat re-purposed. Requirements were as follows:
- much smaller than the old table to allow easy movement around
- still usable as a bed
- no complicated folding mechanisms to whack knees
Bonus features include the following:
- drawers underneath for cutlery and school supplies - extension to the port side for cocktail placement from the port settee
I took the the old table and added about 3 inches on each side and trimmed it around with black walnut. So it's made of mahogany, maple, birch, walnut, and teak. I recycled the fiddles from the old salon table. The side fiddles (fore and aft actually) are on removable pins. The pins will allow me to make a couple of simple inserts that have a matching alignment of pins so they will drop in easily. Photo 3 shows the fiddles removed as I am measuring up for the inserts.
This table already makes a huge improvement in our enjoyment of the salon.
