Difference between revisions of "Transom-Pushpit Rail Removal"
Jump to navigation
Jump to search
(pushpit transom rail modifications and removal) |
Mark Elkin (talk | contribs) |
||
| (One intermediate revision by one other user not shown) | |||
| Line 1: | Line 1: | ||
| − | '''By Howard, ''RToy''''' | + | '''By Howard, ''[[RToy]]''''' |
If you want to access an inflatable dinghy from the stern, consider removing the awkward crossbar above the transom. You'll need to add new stanchions to strengthen the stern pulpit that becomes two separate units after the modification. | If you want to access an inflatable dinghy from the stern, consider removing the awkward crossbar above the transom. You'll need to add new stanchions to strengthen the stern pulpit that becomes two separate units after the modification. | ||
| − | [[image: sternmod_2.jpg|thumb|350px|right]] | + | The picture shows several things:[[image: sternmod_2.jpg|thumb|350px|right]] |
| − | |||
| − | + | *First, you can see the specialized emery cloth sander that the technician is using to sand/polish the starboard side weld joint. You can see the partially polished weld joint on the port side. By using an inside sleeve where the new tubing was attached, that weld joint is easily stronger than it was before. | |
| − | + | *Second, notice how the new section becomes the centermost stanchion bolted to the transom like the others. It may be difficult to see, but I had them pre drill holes (with sleeves to keep water out of the tubing) though the new tubing. I bought new rubber coated stern ladder locks from Catalina that they use on the new boats. Didn't bother to have them add those little hooks that I previously needed to tie the ladder in the up position. | |
| − | + | *Third, although covered by his protective drop cloth, the little transom wood was extended outward about 6 or 8 inches to make that first step even easier. | |
| − | Fifth, although you can't see them I have long stainless steel grab rails on both sides of the ladder. Riley Marine of Long Beach California did such a great job that it is impossible to see any of the welds! Mods cost about $315 (~2004) | + | *Fourth, I have non-slip wood as steps over each ladder rung, plus a big wood step covering the rectangle where the ladder is through bolted into the transom. It's difficult to describe, but the bottom line is that I put wood non-skid steps any where I could put them. |
| + | |||
| + | *Fifth, although you can't see them I have long stainless steel grab rails on both sides of the ladder. Riley Marine of Long Beach California did such a great job that it is impossible to see any of the welds! Mods cost about $315 (~2004) | ||
Latest revision as of 15:52, 17 October 2011
By Howard, RToy
If you want to access an inflatable dinghy from the stern, consider removing the awkward crossbar above the transom. You'll need to add new stanchions to strengthen the stern pulpit that becomes two separate units after the modification.
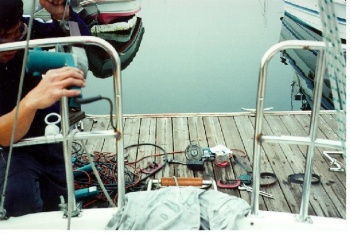
The picture shows several things:
- First, you can see the specialized emery cloth sander that the technician is using to sand/polish the starboard side weld joint. You can see the partially polished weld joint on the port side. By using an inside sleeve where the new tubing was attached, that weld joint is easily stronger than it was before.
- Second, notice how the new section becomes the centermost stanchion bolted to the transom like the others. It may be difficult to see, but I had them pre drill holes (with sleeves to keep water out of the tubing) though the new tubing. I bought new rubber coated stern ladder locks from Catalina that they use on the new boats. Didn't bother to have them add those little hooks that I previously needed to tie the ladder in the up position.
- Third, although covered by his protective drop cloth, the little transom wood was extended outward about 6 or 8 inches to make that first step even easier.
- Fourth, I have non-slip wood as steps over each ladder rung, plus a big wood step covering the rectangle where the ladder is through bolted into the transom. It's difficult to describe, but the bottom line is that I put wood non-skid steps any where I could put them.
- Fifth, although you can't see them I have long stainless steel grab rails on both sides of the ladder. Riley Marine of Long Beach California did such a great job that it is impossible to see any of the welds! Mods cost about $315 (~2004)
