Menu

Show posts

This section allows you to view all posts made by this member. Note that you can only see posts made in areas you currently have access to.

Show posts Menu

Messages - Rick Roberts

#31
I was looking at storage in the galley and thought the bottom cabinet space could be use more efficiently and used to store pots, pants, etc. Anyway looked around and had the idea of relocating the fridge foot pump, fresh water pressure pump and reroute some of the plumbing.


Step 1: Remove the teak cabinet if you would like to make thing easier for yourself. Be careful when removing the wood plugs. You only want to drill the plug while making sure to not damage the surrounding or ruining the screw under.

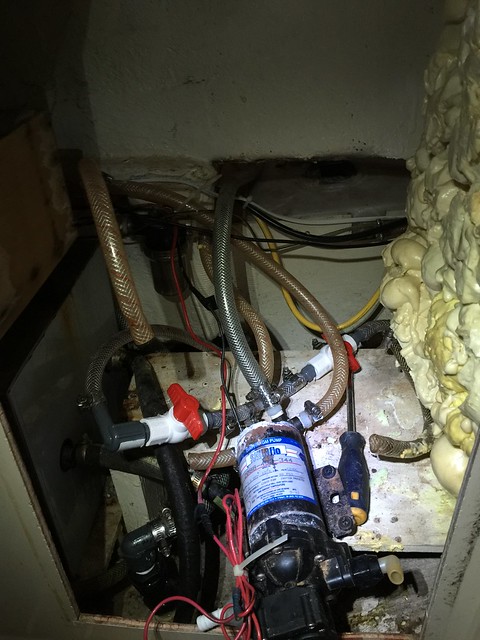
Step 2: Make sure to turn off your water pressure! :thumb: Disconnect water pump plumbing, remove raw water pump and disconnect fridge/icebox plumbing.

Step 3: Now you have to replicate the cut off of the first raw water pump in the fiberglass. I used a sheet of paper, put my flashlight behind the fiberglass to be able to see the outline and create a stencil of the cut. Once you did that, use a X-acto knife and cut the outlines and replicate it to your new favorite location with a sharpie. I personally relocated it on the port side of the previous one. I used a Dremel tool to make the cut and used my shop vac vacuum to limit the amount of fiberglass dust in the galley.


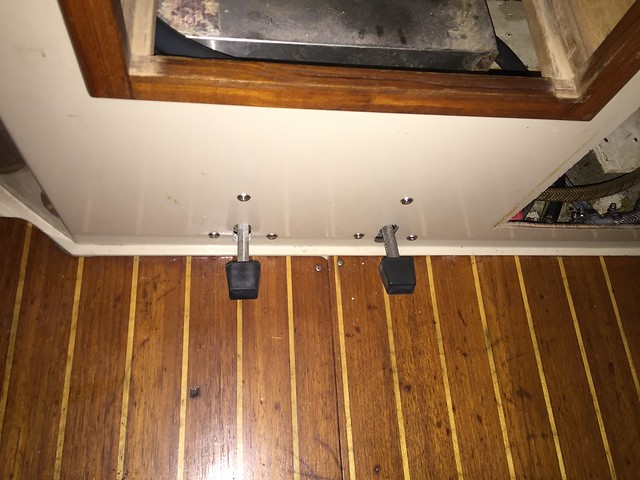
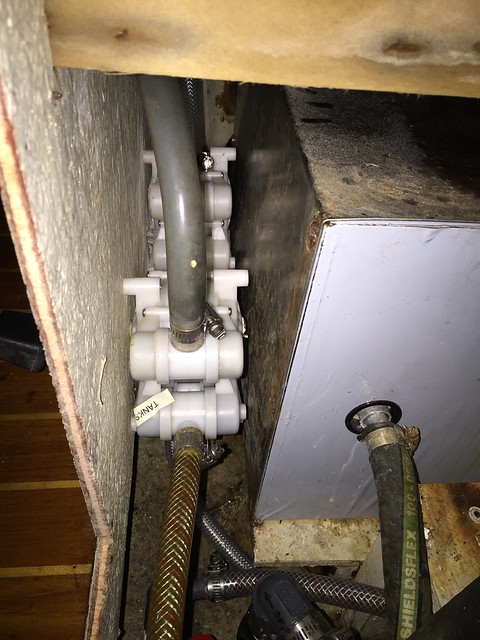
Step 4: I relocated the fresh water pump under the sink and drilled holes for the bolts going thru the seating. Out of the way but a bit harder to access if the fresh water pump goes to sh*t, but I'm ok with that. I played around with the pump to determine the best location and marked the first screw hole location with a sharpie marker. Drilled the first screw hole, I measured the distance between the screws with a caliper gauge and drilled the 3 other screw holes from the seating side, much easier. Install new bolts and nuts.


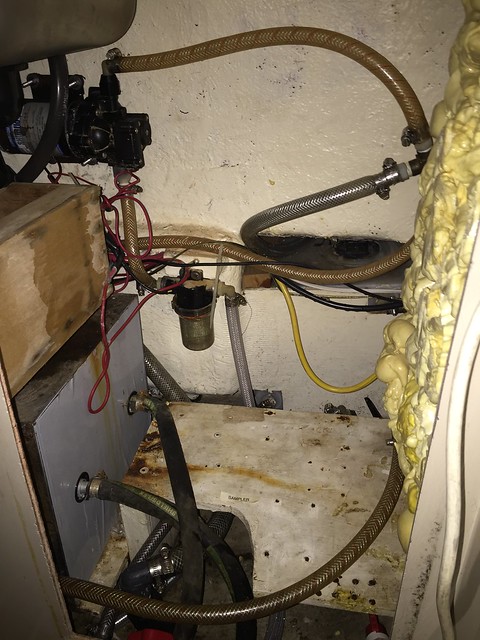
Step 5: Replumb your pumps and take the time to inspect for leaks before reinstalling everything.

Step 6: Reinstall teak cabinets, I would recommend using bolts and nuts instead of screws. Like that you wouldn't have to pluck the wood plugs out again if you have to access it in the future.

Step 7: Enjoy your new storage space. :clap
#32
Quote from: mark_53 on February 28, 2017, 09:20:55 PM
You guys are living the dream. You have many here to support you. Great cinematography. Really like the shots from altitude. I'll be a subscriber.

Thanks Mark, glad you like the aerial footage. I have a few others drone shot that I took last year around Lighthouse Park in Vancouver BC that you might like.
https://www.youtube.com/watch?v=rZV4XjAys1E
#33
Thank you very much guys for all the support and recommendations!  :D

Quote from: Jon W on February 28, 2017, 09:04:00 PM
I've subscribed to your channel. Lots of great sailing YouTube channels out there for you to see for ideas. Are you going to create a Patreon account? Looking forward to watching and learning along with you.

Thanks Jon! Yes, we just setup our account a few days ago since a lot people was recommending it.
Here it is 👉 https://www.patreon.com/wandersailing
#34
Some of you know that Karoline and I have been living on our sailboat for almost a year now in preparation for a massive adventure (to us)... and thought it would be fun to share it with you guys!

With 6 months left to go, it's starting to feel insanely real... especially when we put together this little YouTube trailer as a teaser of what's to come. I'm stoked, I'm terrified, I'm every emotion imagine-able. Please take a peak, subscribe to our channel and give the video a 👍🏽.
So much gratitude to you all for all the support along the way through every word and advices. I think I'll need it all now more than ever!⛵️

Youtube link: https://www.youtube.com/watch?v=-dIpKAIwIfs

Please let us know what you think!  :D
#35
You could also invest a few $$ more and get one of those 100 watts semi-flexible solar panel for $175 USD + a $35 controller for now.
https://www.amazon.com/HQST-Monocrystalline-Lightweight-Solar-Panel/dp/B017OMTAV6/ref=sr_1_4?ie=UTF8&qid=1484211785&sr=8-4&keywords=hqst+solar+panel
http://www.hqsolarpower.com/HQST-100-Watt-Monocrystalline-Flexible-Solar-p/hqst-100db.htm

Could easily expend your system later and they are easy to store under a cushion when you don't need them.
#36
Main Message Board / Re: Lithium Ion battery upgrade
October 17, 2016, 01:08:52 PM
Also found an interesting article on the subject:
https://www.victronenergy.com/blog/2015/03/30/batteries-lithium-ion-vs-agm/
#37
Thanks guys!! George, we are also planning to do the Baja Ha ha. We will be leaving Vancouver early August and slowly make our way down and take advantage of Southern California until late October. Definitely interested to have a boat buddy, let me know how's your preparation going. :)
#38
Main Message Board / Lithium Ion battery upgrade
October 17, 2016, 10:35:41 AM
Hi guys, the more I read and learned about lead acid and agm batteries. The more I keep asking myself, there must be a better solution. I kept thinking about hybrids and electric cars --- > *Lithium Ion*. There is multiple different chemical combinations but the one I was considering was the LiFePO4 (Lithium Iron Phosphate) for multiple reasons;

Lithium Iron Phosphate battery VS Lead Acid battery:
- Charging cycle: 2000 cycles (still gives you over 80% of the original capacity) vs 300 charging cycles
- 70% lighter than lead ( save a few hundreds pound and allow you to store more beers )
- Flatter voltage curve
- Zero Maintenance
- Fast charging: 3 to 5 hours vs 8 to 16 hours
- Discharge rate is <3% per months
- 99% efficient VS ~ 35-50% (don't really want to go under 50% charge and after %80, it doesn't charge efficiently)
- Warranty 3-5 years vs 12 months

Starting seriously about doing the switch. I could cut down my batteries weight from 400 to 60lbs (450Ah golf cart batteries to 240ah LiFePO4 batteries). Solar panels would charge more efficiently, less issues with voltage fluctuation for sensitive electronics, don't have to maintain them, last longer.

Let me know what you guys think, I haven't seen much downside beside the initial cost which seems to be well worth the upsides.

Eric
#39
Main Message Board / Re: Midships Water Tank Vent
October 15, 2016, 08:25:00 PM
Quote from: KWKloeber on October 15, 2016, 07:34:36 PM
Quote

1. Over drill the holes, tape the bottom of holes and refilled them with epoxy.
2. Wait 24h, redrill the holes and bevel the upper end of the hole (~45 degrees).

Just a comment on above -- I have some time doing this and recently did this with 46 thru-deck fasteners (winches, clutches, organizers, etc.)   It's much stronger to create a captive epoxy plug than just overdrilling and creating a thru-deck plug.  In other words, the top and bottom holes in the fiberglass skins need to remain as small as possible, preferable as close to the fasteners diameter as possible.  Then remove the inside core to create the plug that surrounds the fastener.  You use the method RC shows (5/16" dremel -- which means you need to over drill the 1/4" hole to 5/16",) or keep the hole at 1/4" and use the '90-degree, bent finishing-nail" drill bit technique.

RC's method:  photo from mainesail's site--


versus a straight thru plug (again, RC's photos):


anything is better than just drilling the deck, but a captive plug is the best method. 

JTSO
-kk

Well, there is technically less "strong bonding" surface if you do that. If you over drill and after use the "90-degree, bent finishing-nail" drill bit technique. It gives you the best of the 2 worlds, more "strong bonding" surface and bigger distance in between the screw and the core of your deck.
#40
Main Message Board / Re: Midships Water Tank Vent
October 15, 2016, 07:06:17 PM
I had the same issue, sometime the base of the stanchion get bended/arched from lateral pressure (my new slip neighbors hit the stanchion), broke the seal and water sipped in from the vent hole.

What I would also recommend;
1. Over drill the holes, tape the bottom of holes and refilled them with epoxy.
2. Wait 24h, redrill the holes and bevel the upper end of the hole (~45 degrees).
3. Cleanup with rubbing alcohol or Acetone
4. Generously applied butyl tape on the stanchion base. (make sure the bevel part of the hole get filled with the butyl tape)

Since you over drilled the hole, the epoxy will create a sleeve around the screw. Even if it leaks, it won't leak into your deck but simply inside the cabin and makes it easier to detect earlier. Also, *beveling* the holes will give you a greater amount of sealant around the screws and less opportunity to leak. If some of your core is damaged, just use a Dremel and clean it up. You can also use a drill with allen key as a drill bit, aim for the plywood core, not the fiberglass and while it spins it will take the rotten or wet core out. Clean up and now start with step #1. It will fill the void and give a solid and waterproof repair.

Let me know if you would like to see pictures.

Eric
#41
Main Message Board / Re: Replacing lifelines
October 15, 2016, 05:57:16 PM
The other option is to use Amsteel ropes, cost about $1 - $1.20 per foot. You probably have more than enough of 200 feet. Really easy to splice, doesn't rust and less breaking points. My boat came with it when I got it, they are about 7-8 years old and still look good. Just make sure you use some chafe protection where the lifelines meets the stanchions.
#42
Main Message Board / Re: The return of Blackdragon
October 15, 2016, 03:53:13 PM
Thank you very much Stu. We keep her at Burrard Civic Marina in Vancouver. We are subleasing a spot there until the end of March. After that we will have to find a new spot or anchor in False Creek for a few months.
#43
Hi guys,
Recently this year I purchased a 1988 Catalina 34, Blackdragon from Steve (Waterdog). I wish I posted here way before but to be honest I was a bit intimidated by the legacy he left on c34.org . We have done about 500 NM with Blackdragon this season as newbie sailors and had the chance to discover Desolation Sounds this summer.

I'm really excited to meet some of you guys; please don't be shy to come knock on our hull and say hi.

We have big plans for Blackdragon, since we feel she misses Mexico. We are planning on taking her there Aug 2017, continue down south and if we fell confident enough, we plan to turn right towards Australia. Since Australia is part of the Commonwealth, as Canadians we will apply for a 2 year working visa in Australia.

We have so much to learn; techniques to practice, training to take and books to read. As of now, I'm working full time on Blackdragon to get her ready and equip for the big adventure.

Friends and family kept bugging us for a blog. We just put a website up if anyone is interested to see what we are up to.
Wandersailing.com

Cheers,
Eric and Karoline