Menu

Show posts

This section allows you to view all posts made by this member. Note that you can only see posts made in areas you currently have access to.

Show posts Menu

Messages - Breakin Away

#436
Main Message Board / Re: Jib Size Selection
December 03, 2016, 09:14:57 AM
I spoke to Chuck O'Malley at Chesapeake Sailmakers today. I used him to make the new headsail on my prior C250. For the Chesapeake early spring and fall, he recommends a 130 as better than 110. His justification is that even in the shoulder seasons, there are many days that are low wind, and a 130 allows you to stick with one sail instead of switching sails frequently. So I'd use the 150 for summer, and the 130 for spring/fall. In really heavy wind I could do a few wraps on the 130.

Comments from other Chesapeake sailors?
#437
Main Message Board / Re: Socket for tightening keel bolts
December 02, 2016, 08:22:28 AM
My bolt shows a very interesting rust pattern. It's not rusted at all where the bottom of the bolt meets the washer. It is rusted on exposed flat surfaces. So it does not appear to be crevice corrosion. And the other keel bolts are not rusted at all.

I have some thoughts on possible cause, but too little time to write them now.

First tings first, I need the spec on the nut for proper replacement. I've searched all over here and on the wiki and can't find any specs. Am I the first person who decided to replace a keel nut?
#438
Main Message Board / Re: Socket for tightening keel bolts
December 01, 2016, 07:46:29 PM
Grey Pneumatic 2036XD socket works for me also. Before I tighten the nuts, I need to replace one of them per my surveyor's recommendation. What is the spec on the nut? 3/4"-10? Or finer thread pitch? Also, what grade of SS is recommended? If you have a recommended source that would be great also.

While I have the forward-most nut off, I'd like to clean out the rust stains from that front part of the keel sump. What works well for this? CLR? RydLyve? FSR? Oxalic acid?
#439
Main Message Board / Re: Companionway wood slats...???
November 29, 2016, 10:11:56 AM
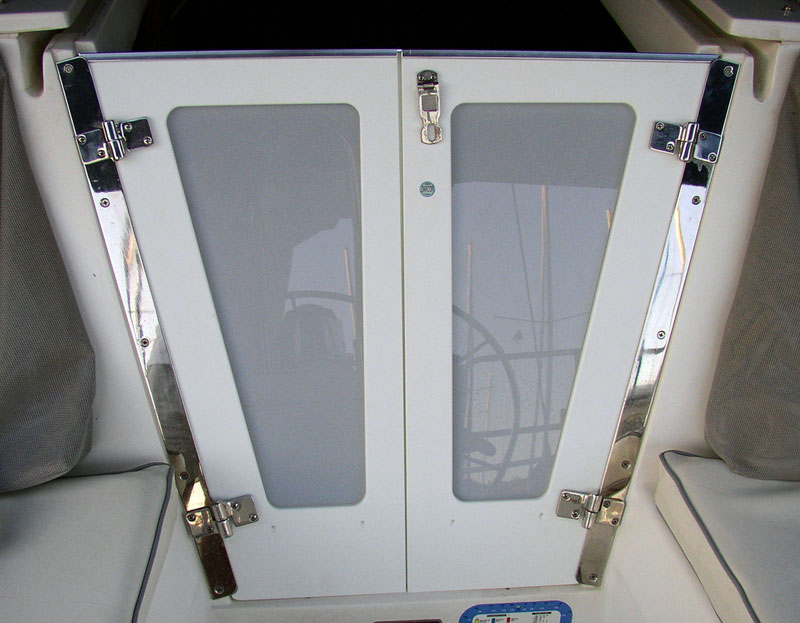
As I mentioned, we had those doors on a one-week C320 charter, so I speak from much more experience than just looking at a picture. The ones we used (not sure they were Zarcor) have a detente that keeps them open at the 90° position. [Edit: It might not be a detente - you'll see that the angle that the doors are mounted causes their weight to keep them open. All I know is it stayed open fine. The slant also takes a little room away from the settee, which may bother some more than others. That angle is much less steep for the C320 and C34 than is is for the C310 shown in the picture, so the space lost is less.] After a week with these doors we decided the positives far outweighed any negatives. And they did allow us to keep the doors closed while in the cockpit, which was very handy for keeping heat in the cabin during our early spring charter. Yet we could still get very fast access into the cabin if needed - much much faster than the hatchboards, which are so cumbersome to remove that keeping them closed is actually are a safety issue while sailing. And they also come with screen inserts for summer use at anchor.

We ended the charter with my wife saying, "We definitely need those when we get our new boat" (which we now have). Then I asked her if it was worth $800 to her, and she said, "Maybe not." We have other "must-haves" to buy first.
#440
Main Message Board / Re: Companionway wood slats...???
November 29, 2016, 09:47:14 AM
If you're looking at replacement anyway, you might check into the companionway doors from Zarcor and others. The Zarcor ones open like normal doors, and are also removable if you want to get them entirely out of the way.
I had them on a charter boat once, and they were NICE. They are pricey, which is why I'm sticking with what I have. But if I needed to replace mine, I'd probably go with Zarcor.

One mod that I have on my list is to make a replacement for the middle hatchboard (my boat has three, not two) which consists of a wooden outline frame and screen in the middle. It would improve ventilation through the boat while anchored out, while keeping bugs out.
#441
Main Message Board / Re: Propeller cleaning & treatment
November 28, 2016, 05:46:49 PM
I bought my boat mid-June and had to have the yard do the paint before launch. They used Barnacle Guard. When I hauled end of October (4 mos in the brackish water in Rock Hall) there were about six barnacles on the prop and a dozen on the shaft. Not totally pleased. I will try it again this spring, unless anyone has a better idea. I'm in a DIY yard now so I'll have a chance to do it my way - I just need suggestions, since this is my first time in something other than fresh water.
#442
I don't question that improper blocking could cause the separation. But do you really think that it's the ONLY thing that causes this? The smile has been known to happen to other Catalina models too, and one of the causes I've heard was Catalina's use of wood as a space filler in the keel stub. Once water intrudes, the wood rots and the keel starts drop enough to separate. Apparently Catalina eliminated the wood at some point, dramatically reducing the incidence (not sure exactly when). I'll let you long-term experts fill in those details.

My point is that there can be multiple things that cause the smile, and no one single thing is 100% guaranteed to stop it.

Also, to pick nits for a minute, while the boat's stern can be raised and lowered by adjusting the aft/mid stands, the weight that sits on the aft/mid stands is pretty much the same, dictated by the center of mass of the hull. I think what you're trying to say is that having the back part of the keel bear too much weight can torque the keel in a way that encourages separation at the front edge. And this distribution of weight across the length of the keel could be adjusted by a combination of block height/location and the boat's attitude relative to the blocks. But I would think that small adjustments in the boat's attitude are going to keep the boat's weight distribution pretty much the same between the keel and the aft stands.
#443
Main Message Board / Re: Frugal HX pencil zinc mgmt. LOL!
November 27, 2016, 06:20:11 PM
Looks like you may have a stray current issue. Do you leave your boat plugged in? Do you have a galvanic isolator?
#444
Perhaps OP can give an example of a car company issuing a recall on cars that were manufactured 30 years ago. I'm not aware of any. Why should a boat company be held to a higher standard?
#445
OK, it has been a very productive couple of days. Three problems solved: coolant leak, oil pressure switch, and tachometer.

First, I borrowed a radiator cap/radiator pressure tester from AutoZone. It does not have nearly as many attachments as other stores', but the one they had fit perfectly. (There are reviews on the AutoZone website claiming that this device only tests radiator caps, but those reviews are wrong.) First I used the double-ended adapter to test the cap, then I hooked it up the the motor and pressured up to 14 psi. In what is a clear violation of Murphy's law, the coolant leaked out the hose fitting right at the coolant cap, so it was easily tightened and held pressure all night. I had been misled on the location of this leak because of the long path the leaked coolant took back to the outside of the heat exchanger, then dropping off the HX onto the floor, and eventually forward into the bilge. I thought it was from the hot water tank or from the HX, but it turned out to be from the easiest place to fix.

With that fixed, I wired up the new oil pressure switch with the existing wires. Those wires are very stiff and especially resistant to twisting into the needed orientation to go onto the tabs (especially with SuperLube on my hands!). But eliminating the double-crimp by rewiring to the alternator looks like it will require either removing a bunch of hoses or the alternator itself. That's too much to take on with a short timeline to winter. It's on the list for spring, but I needed to focus on winter preparations, so the existing wires went back on as-is.

Once I had my cooling bucket all set up through the emergency hatch (see pic below), the motor fired up right away and the pressure alarm stopped immediately. Switch fixed! Motor ran for 20 minutes to heat up the oil. At this point I noticed that my on again/off again tachometer problem was on again. Tach initially revved up when initially starting, but immediately went to zero. Since this is an intermittent problem, I stopped and started the motor a few times to see if it persisted. Same thing every time - no tach after initial startup.

Last weekend I had tried to pump out the oil twice, with a drill pump kit and then a hand pump, and neither one would draw the oil at anything close to an acceptable rate. So I sprung for the really nice Jabsco Quick Change pump with the bronze impeller pump (not the cheaper and more problematic diaphragm pump). While expensive, it does the job great and minimizes your time in cramped quarters handling hot oil. Just pump it out into the permanently mounted pail, then reverse the pump direction to pump it into a disposal bottle. So the oil, filter, and ATF were both changed easily.

I was going to defer fixing the tachometer until spring, but decided to see if there might be a quick fix. The tach lead on the back of the alternator was right at the top - easily accessible, with no rubber boot on it. It also had original paint on the nut and threads, which is often not a good sign. So I took off the nut (along with its paint), cleaned up the loop terminal and everything else, and hooked it up again. While doing this, I noticed some coolant residue from the prior coolant leak, and it occurred to me that this residual liquid may have shorted the tach lead to ground. This could also explain the intermittent nature of the tach problem, since tach would seem to work fine after several days of drying, but could short out with fresh coolant splashing onto the mount. Just a hypothesis - I may never know for sure unless something happens again.

So with this fix done, I fired up the motor to prepare for winterization. Tach worked perfectly. Once again, I shut down and restarted a couple of times, and tach worked each time. So with three problems fixed in one weekend, I decided it's time to winterize. I drained residual water from the muffler and the raw water strainer, the filled the strainer with antifreeze and started up. While running I continued to pour 3 gallons of antifreeze through the system via the strainer, than noted that the exhaust was clearly expelling purple juice. I shut down with a brief surge of throttle (which a mechanic friend told me to do because the excess fuel fogs the cylinders), taped shut the air intake and exhaust, and called it a season. I can't wait to blow out the antifreeze in spring!

Now to strip the rest of the canvas and put on the cover (plus raking and mowing around the house). It never ends...
#446
Main Message Board / Re: Rotella T vs. T4
November 25, 2016, 10:29:02 PM
I've been dropping by every auto place I can find looking for T4 in quarts. Was at AutoZone and Advance Auto on Wednesday, Pep Boys today. It's the same everywhere - around here they all have Rotella T4 in gallons, and Rotella T in quarts (or no quarts of T or T4). Absolutely nobody around here has Rotella T4 in quarts.

My oil change will will be done tomorrow (unless something goes wrong), followed immediately by winterization. In the unlikely event that I need more than 4 quarts to finish the job, I'll have to open a second gallon of Rotella T4.

I think that Shell is in the middle of their changeover from T to T4, and their distribution channel has lots of quarts of Rotella T to get rid of before they start selling T4 in quarts.
#447
Quote from: KWKloeber on November 24, 2016, 10:09:16 PM
Which swtich tab was broken off -- with the single crimp or the double crimped wire?

kk
Actually I do not remember, since it has been so long since I pulled the other one off to shunt them together for testing. They're still shunted together until I go down to finish the job tomorrow.
#448
Main Message Board / Re: Gradual loss of coolant
November 24, 2016, 10:12:03 PM
I am not sure yet, but I may have found traces of EG residue coming from the engine area to the bilge (not the hot water tank). I've borrowed a radiator pressure tester to apply some pressure to the system, and placed towels and pads in various places hoping I'll see where the coolant is dripping from. Before I apply the pressure tomorrow, do any of you have tips on how to do a pressure check? (Can't find anything in the wiki on this.)

In particular, since my coolant reservoir is mounted higher than my motor, I want to stem to flow of coolant once I take off my pressure cap. Can I just put a pinching tool on that hose, or will that damage the hose?
#449
Main Message Board / Re: Mast step / stringer
November 24, 2016, 10:01:12 PM
Thanks, Ken! I was planning to head over there this weekend, and now I'll make sure to!
#450
I finally got the old oil pressure switch off! A 1-1/16" crowsfoot tool was able to get in at the correct angle to grab the flat spots. I threaded on the new switch, but ran out of time before I was able to connect it. I'm not going to use the AutoZone pigtail because there are two large gauge wires crimped onto one of the connectors, and I'm not comfortable butting two larger gauge wires down onto a much smaller gauge single wire on the pigtail. Also, when I tested the connector on the new switch, it went on so tight I nearly destroyed the switch getting it off. And that's with it right in front of me - someday I may need to take it off and it's going to be in a very inaccessible part of the motor, so not gonna go there.  I'm going to fix what's broke, and leave what's working.

I borrowed a radiator pressure tester to track down a coolant leak this weekend. After fixing that (hopefully just a loose hose clamp), I'll heat up the oil, change it and the filter, put the antifreeze in, and then I'm done with the motor for the winter. I'll finish pulling off all the canvas and put the cover on.