Menu

Show posts

This section allows you to view all posts made by this member. Note that you can only see posts made in areas you currently have access to.

Show posts Menu

Topics - mainesail

#1
For those interested I have secured a 10% discount for Epoch LiFePO4 Batteries. By far the best constructed, featured, priced and  ABYC compliant batteries we've found. This discount was intended for readers of Marinehowto.com and Boat Electrical Systems but, I figured Let you guys know too.

Please email me for the discount code: compassmarineservices at gmaildotcom

EPoch Batteries

Oh and my friend Ben Just published an article on these after I turned him onto them..

Panbo- Epoch
#2
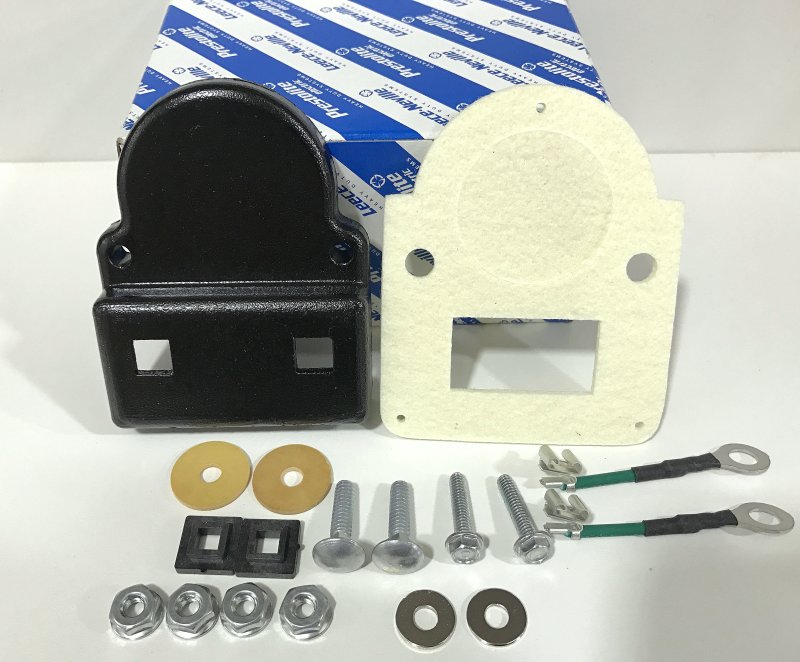
I figured I would post this here first. Years ago Leece-Neville discontinued these kits which put a real damper on our alternator business.We wound up scouring the globe to find any that were still in stock. We re-imported 400+/- from Europe $$$. Finally after two years of begging and pleading they did one last production run of 625 for us before they destroyed the machine that built them.

I have 5 cases of 25 each left. Our landed cost on these was $44.12, I would let them go at cost provided the buyer agrees to not sell them to buyers who don't have a genuine Leece Neville alternator (a contract we had to sign with LN to get these made for us).. If anyone wants to buy the whole lot you can sell them for good money as these are the only ones left in existence. I do not have the capability to sell these one at a time so please don't ask.


I would prefer a local pick up in Maine if possible..
#3
SOLD....


We sold a CMI-105-ER (105A stator / rotor) to one of our customers on 10/8/2019. He then decided he wanted to go to a larger alternator with a serpentine kit (he went with a Balmar). The alternator was delivered to him & then immediately returned to us, but the box was never even opened. Has a single v-pulley (3/8" belt). This is a 1" foot alternator that ships with a 2" fit kit and 10mm to 3/8" reducing sleeve (fits 10mm or 3/8" pivot bolts. This alternator is specifically built on the same platform/frame Universal engines used. This alternator is externally regulated only.

$310.00 plus shipping

Contact me at: compassmarineservices at gmail dot com

You can't find a better deal on an externally regulated alternator...

#4
Found this on another forum:

"After a pleasant half season with my new (to me) XXX the timing gear cover has cracked where the (original) alternator bracket bolts to it & now leaks oil. I was aware of the new bracket upgrade but thought I could skate threw the season with it and do the retro in the fall as the engine only had 600 hrs on it."


One more reminder that the alternator bracket upgrade is NOT optional!!!
#5
Main Message Board / Sad News - Lost Member
July 18, 2015, 05:24:13 AM
Sad news guys, SailingJackson / Greg Jackson fell overboard yesterday and very sadly he did not survive the mishap. My sincere condolences to his family & friends.

http://fox6now.com/2015/07/15/racine-fire-officials-elderly-man-found-unresponsive-on-sailboat-on-lake-michigan-taken-to-the-hospital/
#6
Main Message Board / *** Marine Battery Use Survey ***
January 25, 2015, 07:03:30 AM
Hi All,

I am working on a few articles for marine publications and would like to gather some data on marine batteries and their use.

The survey is quick and easy to complete. Please be honest in your answers. Dishonesty or exaggerating serves no purpose to the data I am looking for so please, please, please answer as honestly as you can.

Please note many answers can have multiple boxes checked.


Marine Battery Use Survey:
https://www.surveymonkey.com/r/2FGQHGN
#7
Main Message Board / Sad about the C-36 forum...
June 24, 2014, 05:06:03 PM
It is very, very frustrating to see the C-36 guys lock everyone out of their forum. I personally think this is as crazy as a can of rocks, but I digress.

Forums are meant to share, research and/or learn about a particular boat. I often popped in there and would help folks out if I knew the issue, and I know the C-36 quite well. I will no longer go there until they open it back up to everyone.

Most owners association forums are OPEN TO EVERYONE, if you register. Cape Dory, Ericson, Island Packet, Oday, CS Yachts, Nonsuch, Most all Catalina's, Tartan etc. etc. etc... Heck I've not come across any power boat brands that lock down list serves or forums and some are as good as C-34 & C-36...... (yes guys I do work on the dark side too)

The forums or list serve groups help SUPPORT the model or brand and help keep values UP! My brother recently bought an Albin 28 power boat. He bought it because of the forum support and knowledge base he was allowed into, as a NON-MEMBER...... He spent weeks reading the forums and doing research, because he COULD. He is now an Albin owner and good contributing member.

Potential buyers come to research, owners of other brands google search and find out the C-36 used XXX motor and while there they see an issue they resolved and post about it. Owners of C-36's benefit from having open access, as do others in the general sailing community.

It is tremendously sad that the C-36 association forum has become a C-36 "exclusive" Country Club.

Locking a model or brand forum down is simply bad business IMHO.. I owned a C-36 so don't need any info from the site, but I still find it very frustrating for the future of the organization.

Please C-34 don't take the route the C-36 org has..... Sad day!!!

"Newbie here I am looking to buy a C-36. Knock, knock, knock.... Hmm they won't let me in?? Oh hello C-34 what a great group of guys and gals I think I will buy a C-34 and NOT a C-36..."

Sorry for the rant... Now have at me.... :D

#8
Hi All,

After many pokes by my site readers I finally finished my article on replacing the alternator bracket on an M-25... There are lots of details & pictures... Hope this helps....


M-18 & M-25 Alternator Bracket Upgrade (LINK)

#9
Main Message Board / Catalina-36 Web Site Not Working
December 03, 2012, 02:00:00 PM
Hi Guys,

If anyone knows who is in charge over on the C-36 forums and web site please let them know the site has melted down. I have tried to log in via IE, Google Chrome and Mozilla Firefox but the same errors occur on all of them. The site is having issues..

I don't know who to contact but perhaps someone here does....
#10
Main Message Board / Universal Wiring Harness Upgrade
November 10, 2011, 01:12:50 PM
I know Ron and Stu have been harping on this for years but I still come across boats almost daily without these upgrades. Finally dug out some images from my library and put it into words & pics.. Hopefully this will make it more easily understandable...


http://www.pbase.com/mainecruising/universal_wiring_harness_upgrade

This one's easier to read:  http://forums.catalina.sailboatowners.com/showthread.php?t=135558

[Stu]
#11
Hi All,

I am working with a company called Electromaax to try and source a serpentine belt kit for the Universal M-25 & M-25 XPB diesel's. Electromaax builds high quality heavy duty alternators, wind gens and water makers and also has serpentine kits for many engines, but as of yet, not the M-25 or M-25 XPB.

This kit would drastically limit belt dusting and allow significantly larger alts for those with banks that can take the current, like AGM or GEL battery owners.

As many of you M-25 owners know the factory belt is really limited to 80-85 +/- amps due to the belt size and with a serpentine kit an alt of 160 amps or more is possible. If you have AGM's or a large bank of wets this means a LOT less engine run time to replenish the Ah's used. Even a bank of four flooded T-105's can take more current than you can produce with the stock belt on an M-25.

Electromaax is willing to manufacture this kit, though they are not completely in-expensive, but they are looking for feedback as to who might want one before spending the time to design them and manufacture them..
If you have interest in a serpentine kit for an M-25 please email John at:

jstevens AT electromaax DOT com

http://www.electromaax.com/

Kit would look something like this:
#12
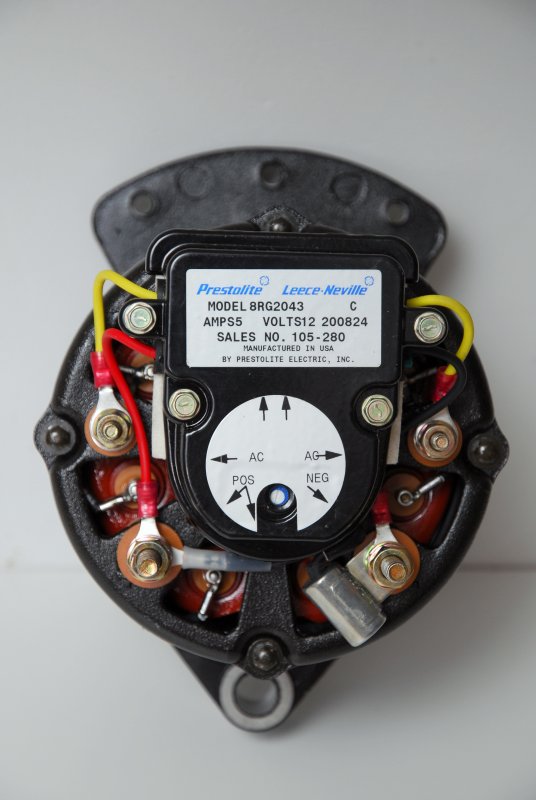
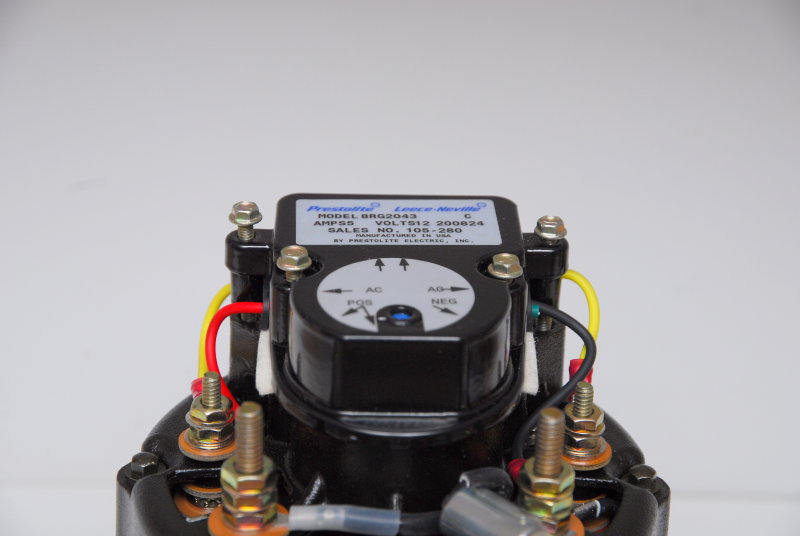
Many boats, specifically sailboats, come equipped or have have used the 5" case Motorola/Prestolite/Leece-Neville style alternator over the years of production. This case style alternator today is built by Leece-Neville. They are specifically marinized and are called the 8MR series or marine series. They are available many outputs from 37 to 105 amps and in a 2" single foot, 1" single foot, and single ear and triple ear configurations. The regulators though are all the same design.

The regulators that comes stock on most new 8MR series alternators are voltage adjustable but still only a two-stage (bulk & absorption), often referred to as single stage. They do bulk and absorption but not float like a three stage regulator does. They also lack on battery volt sensing, on battery temp sensing and a means to protect the alternator from over heating itself and self destructing.

This will show you how to convert a Motorola/Leece-Neville style alternator to external regulation. Once you have done this conversion you can then use a Balmar external regulator and "Belt Load Manager" to current limit it a bit. (I do not recommend the use of any other regulator with these alternators)

This particular alternator is a 90 amp Leece-Neville 8MR2070TA with a 1" foot and triple adjusting ears. It fits many Universal and Westerbeke engines as well as some others. I am a dealer for these alternators so just PM me or see this article on my how to web site: https://marinehowto.com/external-alternator-regulation-conversion/


The first step in this conversion is to remove the four machine screws holding the regulator onto the alternator. They've been loosened so it's easy to see which ones they are.


The next step is to remove the four wires that connect the regulator to the alternator. This is as easy and straight forward as it sounds.

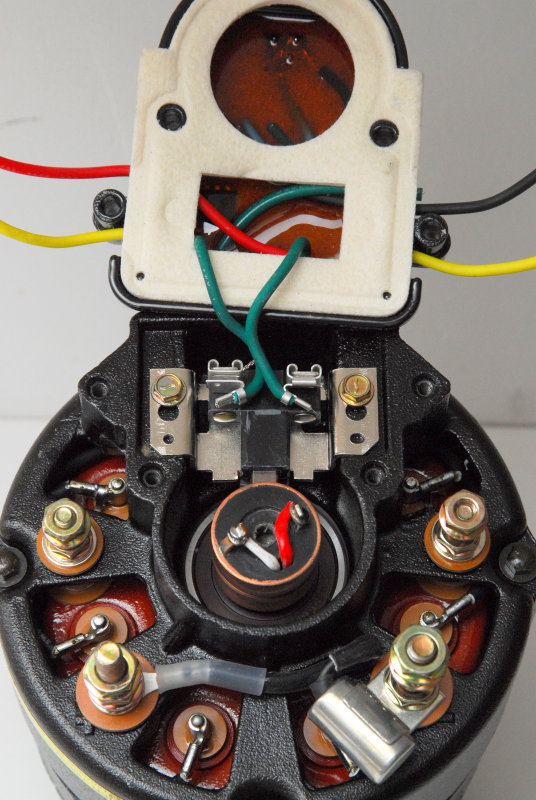
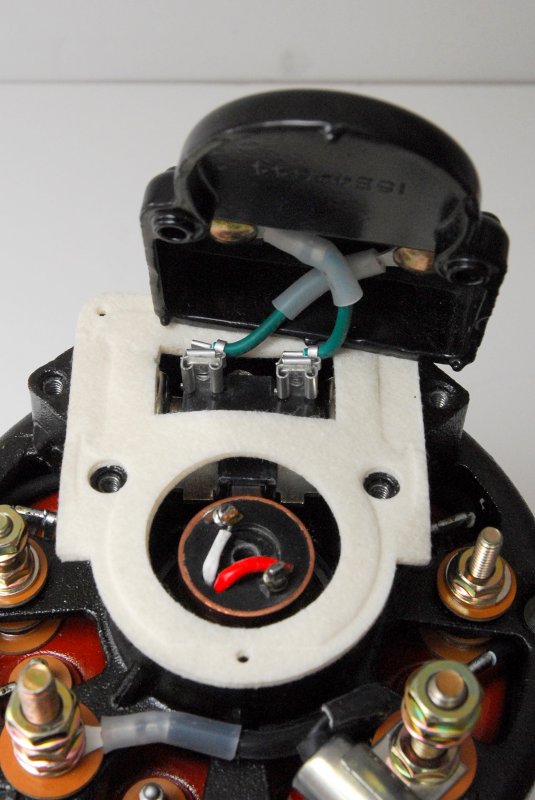
Once the wires are disconnected simply tilt the regulator up to exposed the internal brush connections. You'll need a set of needle nose pliers to pull the connectors off the brushes. This is quite simple and takes about 20-30 seconds to do so.


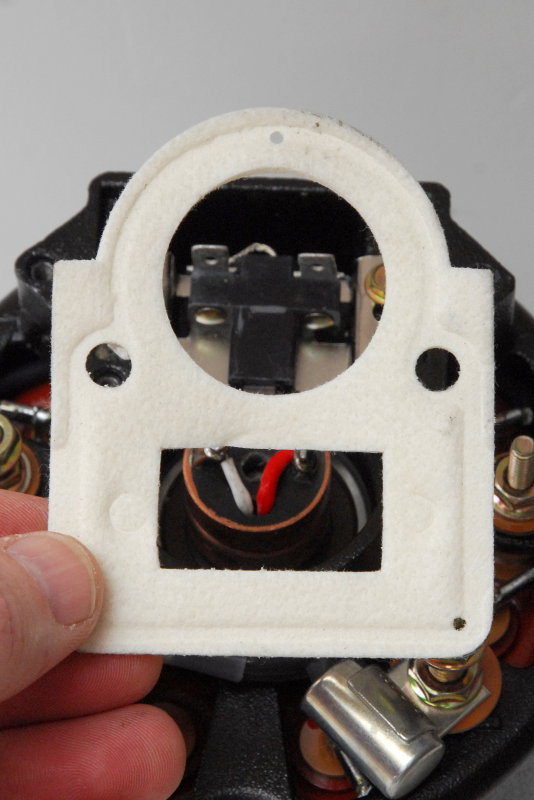
Aside from the epoxy coated finish and general marine construction of the 8MR series this gasket is what makes it USCG compliant and ignition protected. It prevents errant sparks from the brushes from igniting any potential fumes. With most diesels this is not really a huge concern but it's still a good idea to re-use this gasket upon reassembly.


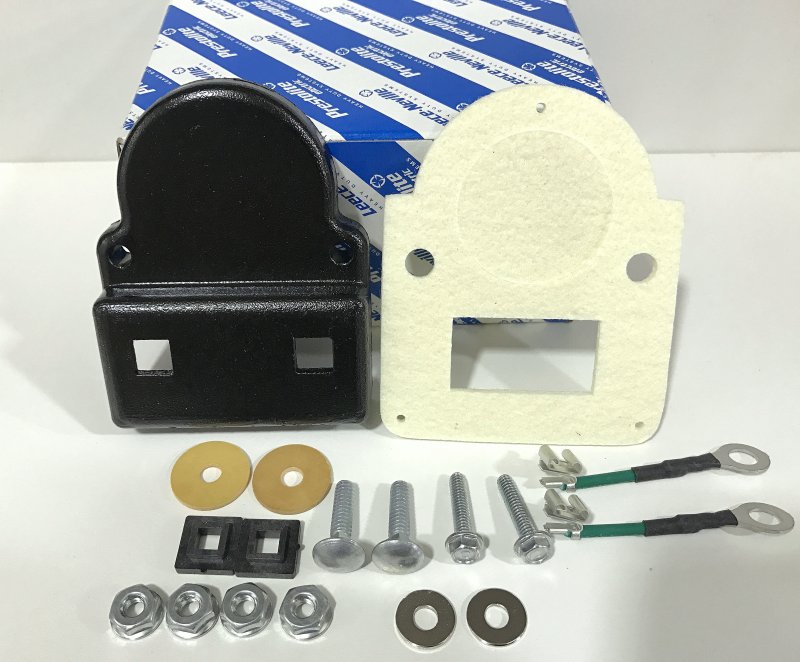
UPDATE: This part / kit has been discontinued by Leeve-Neville but I bought up all the stock I could find in order to continue building these alternators.


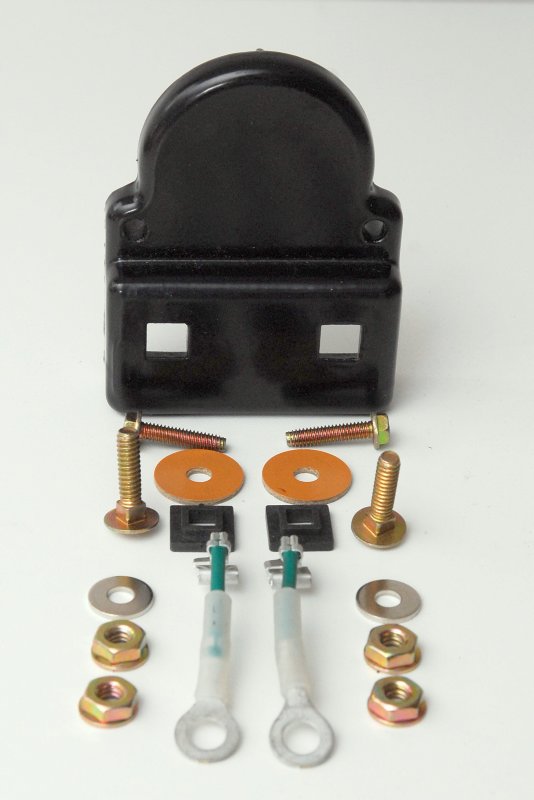
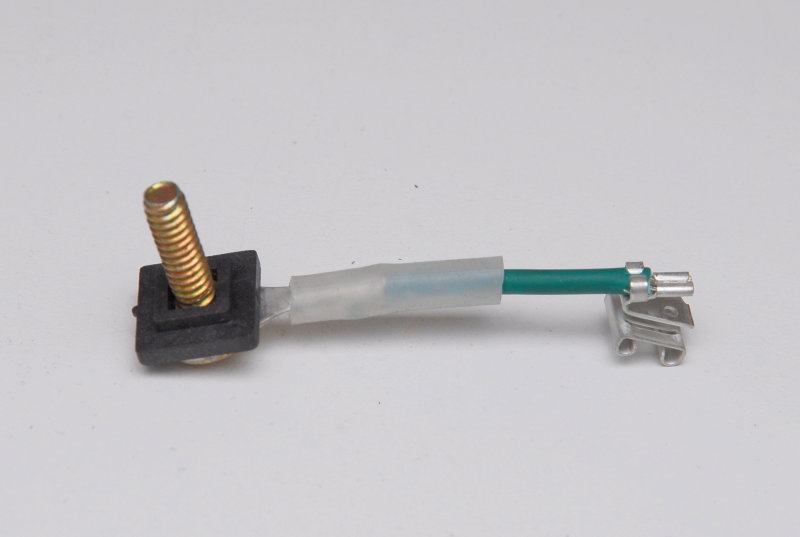
The conversion kit comes with everything you'll need, including the wires, bolts and insulators, to make this a simple conversion.


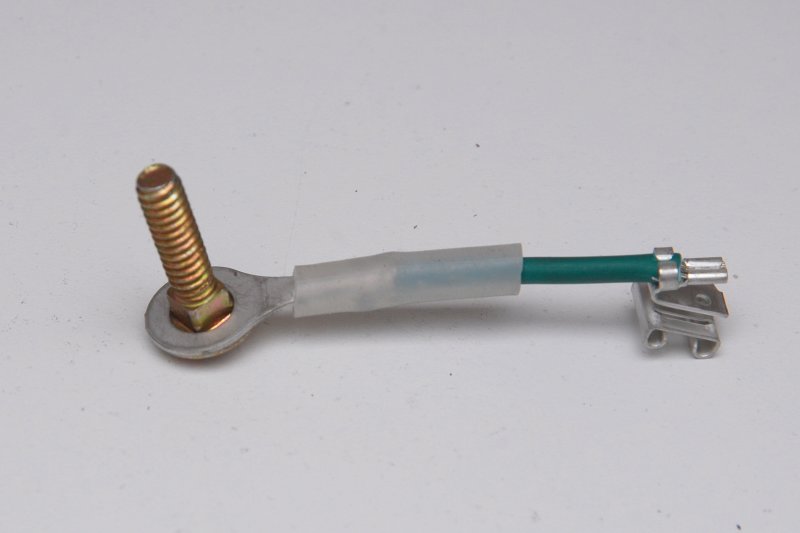
The first step in assembling the kit is to slide the ring end of the wires over the carriage bolts as shown here.


In this step you slide the black plastic insulators over the carriage bolts with the flat side facing the ring and the side with the smaller square facing up as shown.


Because voltage is running through these wires they must be installed and insulated correctly so they don't ground out on the aluminum plate. In this picture the small square is properly oriented to prevent the bolt from making contact with the cover plate and will be properly insulated.


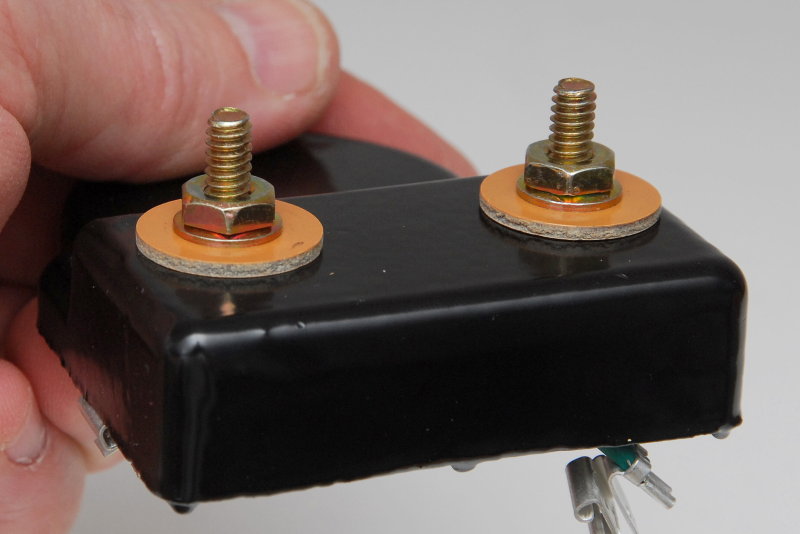
With both bolts and internal insulators installed place the large insulating washers over the bolts. Next drop the two small washers supplied on top of the insulators, add the nuts and tighten them down.


Here's the view from inside the cover plate with everything torqued down and tight.


Slide the contacts onto the brush studs. It does not matter which way you connect these green wires as one will become the field contact and the other will be grounded to the alternators ground stud. Once the wires are connected orient the cover plate over the holes and install the two retaining screws.


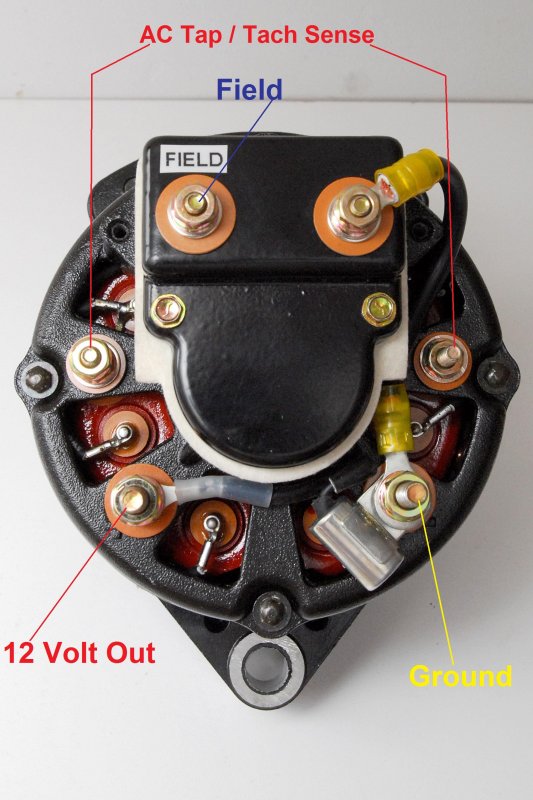
Below is the finished product. One last detail you will need take care of is to create a jumper wire from one terminal of the plate to the ground stud on the alternator. This is the black wire in the photo with the yellow crimp connectors.

Unfortunately my good heat shrink connectors & crimpers were on the boat when I took these photos so I made up a cheap jumper wire for illustrative purposes only.

Leece-Neville recommends a 14ga wire for this jumper.

If you do not ground one of the cover plate studs, to the alternators ground terminal, the alternator will not work. The alternators ground terminal must also be grounded to the boats ground.

I also labeled the field stud with my label maker so it's easy to wire and remember which is which. The stud marked 12V output gets wired directly to the positive side of your boats electrical system . I recommend wiring this directly to a battery, such as the house bank, so you can't fry the alternator diodes by turning off the battery switch when the motor is running.

For your diesel engines tachometer sense simply wire to either of the studs marked AC Tap. You may need to recalibrate your tachometer after the installation of a new alternator.

Follow the regulators manufacturers instructions for the rest of the install.


IMPORTANT:
These alternators are generally sold without pulley and without a shim spacer kit. Only the 90A 8MR2069 is a metric unit with a 17mm pulley & a 2" foot that takes a 10mm Pivot bolt. 17mm billet machined pulleys are much easier to find eg: Delco etc. but will require the Delco "nub" to be machined off the back of the pulley or alignment will be tough. The 8MR2070 (90A) and the 8MR2401 (105A) alts use a 5/8" shaft and a 1" foot with a 1/2" diameter pivot bolt. If you need to adapt these to a 2" foot with 3/8" or 10mm pivot bolt you will need a spacer and sleeve. These cost extra. Don't just assume you purchase the alt and you're done with it you'll still want a quality pulley and the correct shim and sleeves..


This is an inexpensive way to get a brand new, not rebuilt, 90 amp externally regulated marine rated and built alternator for about $215.00. While there are more "heavy duty" alternators this one will serve most coastal cruisers quite well. If you have AGM's or a very large bank, compared to the alternator I would suggest a beefier alternator.
#13
Hi All,

For years I have been trying to describe, as have others, in words, how to "pot" or fill deck hardware penetrations with thickened epoxy to seal the decks core from further moisture damage. I have learned a lot from this community and from the likes of members like Stu and wanted to pay back a little of what I've taken away to this site.

I have also been trying to describe why a slight bevel to each hole that penetrates the deck is a good idea. Sometimes folks understand it via words, and sometimes they don't. There are other methods to achieve the same outcome but this is the one I have found over the years to be the most reliable..

I have had this article on my mind for years and finally over the last month or so had the chance to make it all happen with  some late nights in the barn.

As far as I know this is the only article of it's type that uses deck lamination cut-a-way samples to show what goes on inside the deck when you "pot" with epoxy and countersink the bolt holes..

I hope this helps make some sense of something that really isn't all that difficult to tackle just difficult to describe..

If you see any typos, and I'm sure you will, please let me know and I'll fix them as soon as I can. I'm not a writer,:doh: but do have a lot of tricks & techniques I've learned over my years of boating that I like to share with fellow boaters. Some of these I feel can best be illustrated through pictures, with the help of some words of course..

Click this to read it:

Sealing Deck Penetrations To Prevent Core Rot (LINK)


And some of the photos from the article;


#14
Hi All,

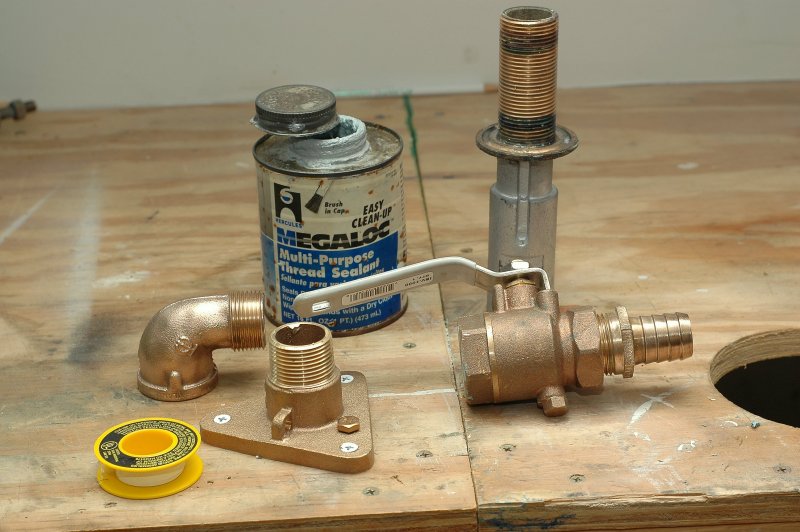
I finished another photo based "how to" article/blog based on the replacement of my through-hulls and sea cocks that I completed last spring.

Take a look and let me know what changes I should make or if the instructions are clear enough for the average DIY boater.

My intent with these articles is to help the average boater save $$$. The labor time involved in this job was a lot and would have translated into a yard bill in excess of 2k if I had paid my boat yard to tackle this job.

I've had great responses, over 630 "thank you notes", on my "Re-Packing A Traditional Stuffing Box" article alone so I continue to do them to help fellow sailors in any way I can.

I hope this article helps as much as the others I've done..

Here it is: http://www.pbase.com/mainecruising/replacing_thruhulls

#15
 Hi All,

I have seen this question, "how do I re-pack my stuffing box" posed literally hundreds of times and still no-one had a good photo based article on how to change the flax packing in an old school stuffing box. This afternoon it was ridiculously rainy, hahvin' a Noh' Eastaah, and too miserable to go to the boat yard so I dug out my old stuffing box, cleaned it up and created a photo based how-to article on re-packing a stuffing box. I hope this helps someone and when this question comes up again perhaps we can just copy and paste a link !

If I missed or forgot any important points please let me know and I'll make the changes. As usual I'm not claiming these are the be all end all instructions just the only ones I know of that are in-depth and picture based.

There are two pages to this article so be sure and click page two when you get to the end of page one!

Here's the link: http://www.pbase.com/mainecruising/stuffing_box

Happy Sailing,

Maine Sail
My Sailing Photo Galleries
http://www.pbase.com/mainecruising