Procedure for Covering the Stainless Steel Boarding Ladder Rungs with Wood How many times have we or our significant other stood on the rear boarding / swim ladder and complained that it was killing our feet? I have even heard my
40lb dog complain!
|

|
"woof woof" (I am happy now) |
Well, I promised everyone that this summer we would have wood covered rungs or a "New" Catalina with a walk through transom. If I buy a new boat now, I will have nothing to put on my "Upgrades Page" on our home page, so wood covering it is. Materials / Tools Needed:
1. Teak or Mahogany Boards, I purchased 5/4 x 4" T&G Mahogany decking boards from our local lumber yard. One board 10' long will do the whole project. You may wish to find a 5/4 piece of mahogany that is 14" long by 6" wide to do the top step. I laminated two of the T&G boards together.
2. A drill with a 1" (one inch) hole saw.
3. A router with two type bits. Bits: One inch round or 1/2 rad cutter and a large 45 deg angle edge trimmer with a bearing guide.
4. A table saw or planer to remove T&G off boards.
5. A saber saw with fine blade to cut shape of top step.
 |
 |
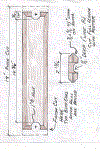
| MIDDLE Step Detail |
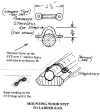
FASTENING THE MIDDLE STEPS Detail |
Click
to enlarge and see the dimensions I used. PROCEDURE:
This is another one of those projects that a picture is worth a thousand words, so stare at the above pictures before reading this procedure.
MIDDLE TWO STEPS:
Measure the total width of the ladder, (in my case 16") and cut boards for the middle two steps 4" longer than this dimension. We now have two 20" x 5/4 x 3" T&G boards. Run through table saw to remove the
Tongue off one side and the Groove off the other.
Measure the distance between the sidebars of the ladder, in my case it was 14
3/8" as shown on the drawing. This will be the inside edge of the two
1" holes that you will drill in from the edge of these new boards. Measure
over ˝" more from these marks and drill a one inch hole on each end. After
the holes are drilled, find the centers and cut off the half of the hole that is
toward the end of the boards. This will leave you a step [that can be slid
between the side rungs and when you step on them they will not twist…much.
This might work as made but I took it one step farther. I wanted my steps to
drop half way onto the ladder rungs so they looked more professional. To do this
I drew a line down the center of they back of the boards and set up a jig on my
workbench to guide the router down the center of the new step board. Clamping
down the work piece and screwing a guide to the bench let me glide the router on
the center of all the new steps. The router had a one-inch wide half circle bit
(1/2" Rad) that I purchased at Home Depot.
I then changed to a large 45 deg. Angle bit and trimmed off all the sharp
edges of the new wood steps. Sand them well and add three coats of Cetol.
After they were dry and installed I added two strips of non-skid material to
the top of each step.
BOTTOM STEP:
The bottom step I cut shorter so that it can rotate. This is OK because of
the way you board the ladder from the water and swing up to the flat position…….the
step swings up with your feet in the same spot…no sliding on the step. This
step was made the same length as the flat area of the SS bar before it starts
to curve up the side of the ladder. Measure yours to be sure, mine was
10". This step has two pieces of wood screwed together with the
one-inch hole drilled all the way down its middle. I did not drill this hole.
I carefully clamped the boards inner face up and routed the same one-inch wide
slot right down their centers. When clamped together they made the step with
half the hole on each piece of wood to make a complete hole. I clamped these
together (screws) and sanded them flush and routed the 45 deg. Angle around
all its edges. Sand them well and add three coats of Cetol. After they were
dry and installed I added two strips of non-skid material to the top and
bottom of this step…..remember it rotates so you need non-skid on both
sides.
TOP STEP: "Mini Swim Platform"
The top step was made differently. I glued and clamped two of the boards
together. The existing T & G wood came in handy for this. I guess it would
have been easier to purchase a board the proper width though. To determine the
width needed, (mine is 17") I cut a cardboard template and laid it
on top of the ladder. I made it wider than the existing ladder and cut an
angle on the front to clear the swinging up ladder in the up position. I
curved the edges and transferred the template to the wood. I cut out the wood
with the saber saw and carefully rounded the curves so that each side was the
same. When I laid it on the top of the ladder I notice that the SS round
hinge, that the ladder swings in, was higher than the bars that support it to
the boat. This called for a small recess with the ˝" rad. router bit to
make it sit flush. This was fastened to the boat in the same manner as the
steps except I used electrical clamps that they use for electrical conduit as
I was going completely around the 1" SS bar and you can not see them
except if you are in the water….with the jelly fish and cold water in my
area, no one spends long enough hanging on the ladder to notice they are not
stainless steel.
FASTENING THE MIDDLE STEPS:
The sketch above. It explains the method I used. If anyone finds something
that fit without reforming, please contact me.
So that's all there is to it. Get out those saws and give it a shot. Can't
ruin anything on the boat.
Al and Michele#55 "Kindred Spirit" | 
